Wednesday, November 10, 2010

Ugly but Delicious: Green Eggs and Rice

When it gets cold out, I want hearty, warm breakfasts to start my day. But now that I'm home all the time, I have to make the warm breakfast for myself, and breakfast sandwiches every day probably aren't the healthiest plan.

A couple of mornings ago, I surveyed the fridge for likely breakfast candidates. Eggs, cheese, green salsa, leftover brown rice... somehow, combining all of those seemed like the right thing to do. And... it was. It looked, quite frankly, hideous in the bowl, but it was so comforting and filling, I didn't care. No pictures for this - I didn't think this would photograph particularly well.

Green Eggs and Rice
Serves 1

Ingredients

  • about a cup of salsa verde (green salsa)
  • 2 eggs
  • about a cup of cooked brown rice
  • a heavy sprinkle (probably small handful) of shredded cheese (I used a Colby/Monterey Jack blend)

Directions

Pour salsa into a smallish non-stick frying pan over medium heat. When salsa begins to bubble, kick the heat down to medium-low, and crack the eggs into the salsa. Cover (or not - I didn't bother) and cook until the egg whites are just barely set, and yolks are still runny (if it looks just a touch underdone in the pan, it'll be done in the bowl).

Meanwhile, while the eggs are cooking, heat up the rice, and dump into a bowl. When the eggs are done, glop the whole mess on top of the rice, top with shredded cheese, and mix well.


YUM.The egg yolk, cheese, and salsa mix together into a wonderfully creamy and tasty sauce for the rice... it's like a breakfast stew. It may be ugly, but it's good, decently healthy, and filling, and sometimes, that's all you need.
Saturday, October 2, 2010

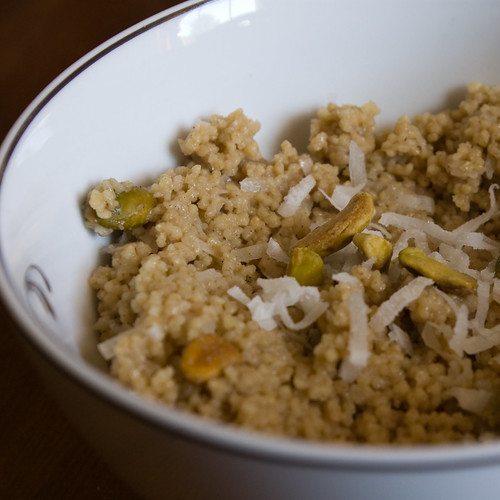
Breakfast (or Dessert) Couscous

This morning, I was ravenous, and I wanted to make a hearty stick-to-your-ribs kind of breakfast. Unfortunately, the hubby woke up after a night of stomach troubles (poor guy) and asked that if I were to make breakfast, to please make something innocuous. Now, for us, innocuous means no eggs, no dairy, no grease... so basically, 90% of my breakfast ideas were not an option, especially since I had no desire to go out food shopping in order to get ingredients.

Then, I started thinking... what about couscous? A quick google search revealed that sweet couscous was not a novel idea - there were tons of recipes already out there. But alas, most of them involved dried fruit, which I didn't have on hand. After a quick survey of the pantry though, I had formulated a plan that fell somewhere in between Middle Eastern and Indian inspirations.

IMGP4867
Breakfast (or Dessert) Couscous
Serves 3-4 for breakfast, more for dessert

Ingredients
  • 1 3/4 cup milk (I used almond milk, soy or coconut would probably be good here too)
  • heaping 1/4 tsp cinnamon
  • heaping 1/4 tsp ground cardamom
  • 1 1/2 Tbsp brown sugar
  • 1/2 tsp vanilla extract
  • pinch of salt
  • 1 cup instant whole-wheat couscous
  • 1/4 cup shelled pistachios
  • 1/4 cup sweetened shredded coconut
Directions
Microwave instructions:
Combine all ingredients except couscous, pistachios, and coconut in a microwave-safe measuring cup, and stir to combine. Heat in microwave until boiling, about 3-4 minutes (keep an eye out for boil-overs, which I didn't watch for - oops).

While the liquid is heating, measure out the couscous in a heat-safe bowl. When the liquid mixture is heated, stir once more, pour over the couscous, and cover the bowl until the couscous has absorbed the liquid, about 10 minutes.

Once the couscous has absorbed the liquid, fluff with a fork and mix in the pistachios and coconut. Serve hot, mixing in a little extra milk if desired.

Stovetop instructions:
Combine all ingredients except couscous, pistachios, and coconut in a medium saucepan (seriously, use one size bigger than you think you'll need) and bring to a boil over medium-high heat, stirring occasionally. Watch for boil-overs!

As soon as the milk mixture is boiling, kill the heat, and add the dry couscous directly to the pot. Stir, cover, and let sit for 10 minutes. Once the couscous has absorbed the liquid, fluff with a fork and mix in the pistachios and coconut. Serve hot, mixing in a little extra milk if desired.


This was so satisfying. Even though couscous is not a grain (it's technically a pasta), the form factor and texture makes it comparable to steel cut oats or grits, so it makes perfect sense as a breakfast food. Plus, most couscous sold in the US is of the instant variety, which is basically foolproof as far as cooking goes.

Sorry for the inexact measurements. For this first attempt, I used the smaller amount of almond milk, and the larger amounts of brown sugar, cinnamon, and cardamom. Both the hubby and I agreed it might be just a touch too strongly flavored and too sweet like that, so I would recommend going between those seasoning measurements to taste. As for the liquid amount, I think a slight amount of extra liquid would add just a bit of pleasant creaminess to the whole shebang. Also on the list to try next time - 1/2 cup golden raisins, added to the dry couscous.


Update (10/23/10):
I made this again and adjusted some of the amounts. I upped the milk to 1 3/4 cups, reduced the cinnamon and cardamom to a heaping 1/4 tsp each, and reduced the brown sugar to 1 1/2 Tbsp. I think the flavor profile was a little more balanced. I also made it on the stove. If I'd had any extra milk, I would have also poured just a bit into each bowl to give an extra bit of creaminess. The recipe has been updated to reflect these changes.

Mexican Poached Eggs

Who here likes making big full dinners after work?

Don't all raise your hands at once.

Well, for the 100% of us who don't want to spend the entire night dealing with dinner, here's a dish that is practically the embodiment of the Slacker Gourmet philosophy.
  • It's quick - about 15 minutes from start to finish.
  • It's easy - if you can open a can, open a jar, and crack an egg, you have the necessary skills to make this.
  • It's versatile - it works equally well for breakfast, lunch, or dinner.
  • It's cheap. Like, really cheap. You probably have 3 out of the 4 ingredients on hand already.
  • It's really satisfying. It may not look too pretty, but after a full day at work, it's the perfect warm, tasty, and healthy meal.
This is very loosely inspired by the Italian dish Eggs in Purgatory, which was one of those eye-opening epiphany recipes for me - namely, "Hey, I can poach eggs in flavorful liquids, not just water!"

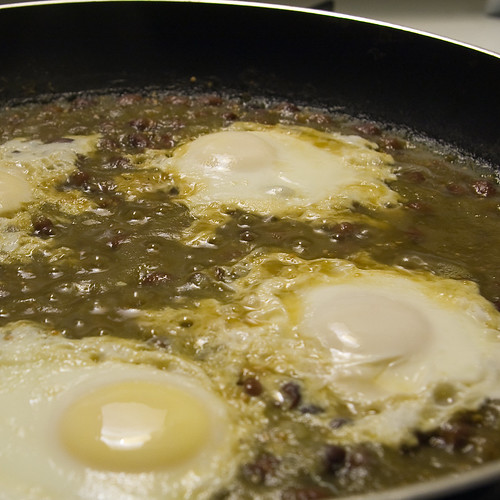
IMGP4864
Mexican Poached Eggs
Serves 2

Ingredients
  • 1 14.5oz can black beans, drained and rinsed
  • 1 1/2-2 cups salsa (I used salsa verde)
  • 4 eggs
  • Queso fresco, crumbled

Directions
Combine beans and salsa in a large skillet over medium heat and simmer for 3-5 minutes. Break the eggs into the bubbling mixture, spacing them evenly in the pan. Cover and let simmer for about 5-6 minutes, or until whites are barely set (on my stove, this results in firm but slightly creamy yolks). Scoop beans, salsa, and 2 eggs into each bowl and top with queso fresco.


Like I said before, this is not a pretty dish in the slightest. There's really no good way to present it, and I find it's ultimately the most satisfying when everything is just glopped together in a bowl. I definitely recommend queso fresco as the cheese topping, as opposed to something melty like shredded monterey jack - both for flavor and texture.
Sunday, September 12, 2010

Fondue Theory

Sorry for my absence, all 2 of you who read this thing. Does it count as Slacker Gourmet if I come and post about gourmet meals after slacking off for months?

Tonight, I would like to talk about fondue - specifically cheese fondue. What? Fondue isn't Slacker Gourmet, you say... it's tricky and fancy, not to mention reeking of the swinging, gold chain, overly-chest-haired '70s! Ah... but it's really not as hard as it sounds, if you have the right tools (like an electric fondue pot and a food processor with a shredding disk)!

The aim of this post isn't to give the end-all, be-all of cheese fondue recipes, but rather to advance a basic theory I cobbled together based on watching the For Whom the Cheese Melts episode of Good Eats, reading the fondue recipes in Mark Bittman's How to Cook Everything, and general web research.

Basic Cheese Fondue Recipe
Serves 2-3

Special (Slacker Gourmet Encouraged) Tools
  • Food processor with a shredding disk
  • Electric fondue pot
Ingredients
  • 16 oz smooth melting cheese (notice I said cheese, not cheeze... Velveeta is a fon-don't!)
  • 1 cup liquid (preferably wine, beer, or hard cider, though apple juice would probably work as a non-alcoholic option)
  • 1 Tbsp cornstarch
  • 1/2 clove of garlic
Directions
Shred the cheese in the food processor. Put it in a gallon Ziploc bag and toss the cornstarch in with it, seal it up, and shake it all about until the cornstarch is well-integrated and the cheese isn't sticking together too badly.

Rub down the bottom and up the sides of the fondue pot with the cut side of the garlic clove, then discard. Turn the fondue pot on between Warm and 200°F, and add the liquid. You want it to come to a simmer, so play with the temperature dial till it is just simmering - not boiling.

When the liquid is simmering, start adding the cheese, a handful at a time and stir with a wooden spoon. When each inclusion of cheese is fully melted and integrated, add the next handful. For this amount of cheese, the melting and stirring process should only take about 5-10 minutes altogether.

Once all of the cheese is in, if the fondue coats the back of the spoon but still seems semi-liquidy, you're all set - pop the dial back down to Warm and get ready to dig in! If the mixture is too loose, add some more cheese, or if it's too thick, add some more liquid.


This is the basic formula I followed tonight when making fondue for the first time. The shredding disk for the food processor is highly recommended, unless you're the one person in the world that enjoys shredding cheese with a box grater. Likewise, the electric fondue pot saves multiple steps and the headache of making sure the fondue doesn't congeal or burn during consumption.

What about pre-shredded cheese from the store, you say? Well... I haven't tried it, but since this post is all about the theory... if you can find pre-shredded mellow cheeses as your base (Swiss or similar), then try it out! Pre-shredded cheeses already have anti-caking agents added though, so you may need to cut back or lose the cornstarch altogether.

Now, for the fun part...

Flavoring Theory

Traditionally, fondue is made with Emmental and Gruyere. I like this combo by itself, but it also seems to make a good base for fondues that will have an additional strongly-flavored cheese that will be the predominant note. When using a strongly-flavored cheese, try to keep it to 1/4 of the total weight of the cheese in the fondue.

For example, the fondue I made tonight was made with 4 oz Gorgonzola, and 6 oz each of Gruyere and Emmental, and the liquid used was champagne. I'm also theorizing that 4 oz of a sharp cheddar, 12 oz of milder melting cheeses, and either stout or hard cider would turn out a completely different, yet still delicious fondue.

Other flavorings are completely optional at this point, but could be added right after all of the cheese is integrated - some examples include mustard, nutmeg, hot sauce... it's up to the flavor profile you're going for.

Dippers

So, you have a cheese fondue. What do you dip in it, besides the old standard of bread? Again, this all depends on what kind of fondue you're going for.

A traditional fondue lends itself well to all manner of raw veggies and fruits (though, for the raw veggies, you may want to blanch some of the more cruciferous ones, like broccoli and cauliflower). The Gorgonzola fondue I mentioned earlier was fantastic with grapes, pears and apples. A cheddar-stout-mustard fondue would probably be wonderful with oven-baked soft pretzels. Really, the sky's the limit, though I would stop short of dipping your old socks into the fondue, even if you're convinced it would still taste reeeeeeeaaaalllllly goooooood.


Hopefully this convinces you that fondue can be within the Slacker Gourmet's reach, at least for a special occasion (since eating that much cheese on a regular basis would probably ensure that you wouldn't be eating anything, much less fondue, for much longer!).

However, there are other fondues that are more healthy and appropriate for weeknight dinners... <AltonBrown>but that's another post.</AltonBrown>
Tuesday, May 25, 2010

Avocado "Pudding"

So, you have a recipe (say, Tuna Avocado Ceviche) that calls for 1/2 an avocado. No matter how well you wrap it up, even if you sprinkle it with citrus juice, that other half is just never going to be the same the next day. So what, pray tell, do you do with it?

Make dessert, of course!

*crickets*

No, I'm serious.

Avocado's a fruit, and the buttery taste and texture are just as at home with sugar as they are with savory citrusy applications. In all of 2 minutes, you can have a cool, refreshing pudding-like concoction that will be unlike anything you've ever had before, but you'll want to make it again and again. No pictures this time - lumpy green glop isn't particularly photogenic, even if it is delish!

Avocado "Pudding"
Serves 1

Ingredients

  • 1/2 avocado
  • 1 tsp sugar
  • splash of vanilla extract
  • splash of milk (non-dairy milks work well, I used almond milk)
Directions
Put avocado half in a bowl and begin mashing with a fork. Sprinkle sugar on the mashed avocado and mash some more - the sugar crystals help cut into the avocado flesh so it mashes easier. When the avocado is pretty well smooshed, splash the vanilla extract into the bowl and a slightly bigger splash of milk and mix well. You're looking for a pudding-y consistency, so if it's not quite there, keep adding splashes of milk and mixing until it's the consistency you'd like. If you're a perfectionist, I suppose you could do this in the food processor, but I don't mind the lumps. If you have more patience than I do, chill the pudding in the fridge until it's really cold, or just grab a spoon and CHOW DOWN!

Tuna Avocado Ceviche

Ugh. Summer in Massachusetts is very nearly here. Too hot to cook. Too hot to think. Too hot to eat foods warmer than the inside of the refrigerator.

If you've got some time to kill in between prep and eating, then making ceviche is a great way to go. The acid from the lime juice begins to cure the tuna, imbuing it with citrusy goodness. The prep work is minimal - chop, squeeze, splash, mix, and chill. Just before serving, the last ingredient gets diced and added, and voila! A light, refreshing summer meal for those afternoons where it's just too hot to do anything.


Tuna Avocado CevicheServes 1

Ingredients

  • 4-6oz of sushi grade tuna, cut into 1/2 inch cubes
  • 2 scallions, green parts only, sliced
  • 1/2 small jalapeno pepper, seeded and minced
  • 1/2 - 1 tsp minced garlic
  • good splash of soy sauce
  • 1 lime
  • 1/2 Hass avocado
Directions
Combine all ingredients except for avocado and lime in a non-reactive bowl (Pyrex would be good for this) and squeeze 1/2 of the lime over everything, reserving the other half. Mix well and refrigerate for 1-2 hours. Just before serving, dice the 1/2 avocado and mix into tuna mixture. Combine well and serve immediately, preferably over a bed of greens or spinach. Squeeze reserved 1/2 lime over everything, if desired.
Saturday, May 8, 2010

Indian-Spiced Lamb, Chickpeas, and Spinach

I love Indian food. Unfortunately, Indian food doesn't always love me back - something about all the cream and butter, I suppose. Every so often, I try to make an Indian dish, and up until recently, they all ended up as failures. The turning point was when I visited the Indian grocery store down the road, and came away with bags of spices for a fraction of the price that they were in the supermarket (if the supermarket even had all of them!). Finally, Indian dishes I cooked began to taste similar to their restaurant counterparts, if not quite the same. Close enough!

Many Indian dishes are a bit more involved than the usual Slacker Gourmet fare, but the few I've cooked have given me a better understanding of the spices involved in creating that distinctive Indian flavor profile. Be sure to use spices from the Indian grocery if possible - Indian red chili powder is very different from McCormick's chili powder. A closer substitute would be cayenne pepper - but be sure to start with less than is called for and add more to taste.


Indian Spiced Lamb, Chickpeas, and Spinach
Inspired by Spicy Sautéed Chickpeas with Beef and Cilantro

Ingredients
  • 1 lb ground lamb (or ground meat of your choice)
  • 1 can chickpeas, drained, liquid reserved
  • 16oz frozen cut-leaf spinach
  • 1-2 tsp vegetable oil, for sautéing
  • 2 tsp cumin seeds
  • 3/4 tsp red chili powder (cayenne pepper would be an acceptable substitute, start at 1/4 tsp and add more to taste)
  • 1/4 cup chopped cilantro
  • 1 1/2 tsp minced garlic
  • a couple squirts of lemon juice
  • salt and pepper to taste
  • plain lowfat yogurt, for garnish
Directions
Heat oil in a large pan or wok over high heat. When oil shimmers, add cumin seeds, and fry for about a minute, until they darken slightly and start to pop. Add ground meat, season with some salt and pepper, and use a spatula to break it into bits. Brown for about 3 minutes, then add the chickpeas (you did remember to reserve the liquid for later, right?). Let the meat and chickpeas cook together for another 7-10 minutes, until the meat is fully browned and the chickpeas darken a bit.

While the meat and chickpeas are cooking, defrost the spinach in the microwave and squeeze out some of the water. You can throw the frozen spinach directly in, but defrosting it beforehand will speed up the cooking. Once the meat and chickpeas have browned, add the spinach and combine well to heat through. Add the red chili powder, cilantro, and garlic, and pour in the reserved liquid from the chickpeas. Stir to combine, and season with salt and pepper. Let simmer for another few minutes, and stir in a couple squirts of lemon juice to finish. Serve hot, with a good dollop of plain lowfat yogurt (I like to mix it right in to add creaminess and extra tang).


Yes, the instructions for this recipe are a bit longer than the usual Slacker Gourmet entry, but it really comes together quickly - under 1/2 hour from start to finish. For a tasty, warm, and pretty healthy recipe made entirely from ingredients I usually have in my pantry, I consider that a win, and hopefully you will too!
Wednesday, April 21, 2010

Edamame-Shiitake Salad

One of the hardest parts of being a Slacker Gourmet is finding easy-yet-satisfying side dishes to go with simple main courses, such as grilled chicken. Sure, I always have frozen veggies on hand, but those can be so bland. Also, as the weather gets warmer, the desire for cool side dishes grows. So, I give unto you, faithful reader, a 3-ingredient (okay, 4 if you count oil for sautéing) side dish that's light, refreshing, and oh-so-healthy!


Edamame-Shiitake Salad

Ingredients
  • 12oz frozen shelled edamame
  • 1 package fresh shiitake mushrooms, sliced
  • Olive oil
  • 1-2 Tbsp bottled Asian-style salad dressing (I used Trader Joe's Sesame Soy Ginger Vinaigrette)
Directions
Heat some olive oil in a non-stick pan, and sauté the sliced shiitakes. Let cool. Put frozen edamame in a microwave-safe bowl and add about 1/4 cup water. Microwave on high for 4-5 minutes. Drain edamame in a colander, and rinse with cold water to cool down quickly. Make sure the edamame drains well - pat it dry with a paper towel if it's still too wet. Combine the now-cooled mushrooms and edamame in a bowl, and mix in just enough salad dressing to just barely coat the veggies. Cover and chill until cold.
Sunday, April 11, 2010

Sesame Spinach Salad

Frozen spinach. It's a true powerhouse in the Slacker Gourmet's arsenal. Easily thawed for inclusion in casseroles or dips or thrown straight from the bag into a frying pan for sautéing (though that's another post), frozen spinach can be used in countless ways.

Until today, I had never thought to use frozen spinach in a cold salad application. In retrospect, it makes perfect sense - why buy and clean fresh spinach, just to clean it, boil it, and cool it down, when you could simply thaw and drain frozen spinach? I prefer the spinach in a bag, rather than the frozen bricks - it's much more manageable and thaws more evenly. I almost always have a couple of bags each of cut leaf and chopped spinach on hand.


Sesame Spinach Salad
Adapted from Sesame Spinach Salad

Ingredients
  • 16oz frozen cut-leaf spinach, thawed but not warm
  • 2 Tbsp sake or dry white wine
  • 1 Tbsp soy sauce
  • 1 tsp sugar
  • 1 tsp sesame oil
  • toasted sesame seeds, for garnish.
Directions
Squeeze cold spinach in a tea towel or in multiple layers of paper towels, removing as much water as possible. Whisk together the sake, soy sauce, sugar and sesame oil in a medium bowl. Add the spinach and toss to coat with the dressing. Sprinkle with toasted sesame seeds.

TO TOAST SESAME SEEDS:
Preheat a small skillet over high heat. When the skillet is hot, add sesame seeds. Keep them constantly moving (either by swirling the pan or stirring with a wooden spoon). Sesame seeds toast quickly - about 1 minute for black sesame seeds, and between 1-2 minutes for white. They are done when you just start smelling a nutty sesame aroma. Black sesame seeds will turn shiny, and white ones will turn golden.


This turned out to be a good base recipe. I used a sweeter wine (it's what I had on hand) and less sugar - next time, I would definitely use sake and the full amount of sugar. I really like the sesame flavor with the spinach, so next time, I may even increase the amount of sesame oil slightly. For a quick salad requiring no fresh produce, however, this was pretty great!

True Slackerism

This past couple of weeks, I've been quite the Slacker Gourmet - but in the worst way. There has been very little cooking at home - oops! Hopefully this week that will change. It's time to recover from my bad, bad ways, and begin blogging and cooking again.

I've got a few subjects up my sleeve (including my not-so-secret love affair with frozen spinach), so bear with me. I will be back at the stove!
Monday, March 29, 2010

Mediterranean Eggplant Sandwich

Lunchtime ennui. It's an affliction that strikes millions of Americans every afternoon. It's especially hard to avoid it as a Slacker Gourmet.

Leftovers? Maybe sometimes, but most of the time, it's just not that appealing the next day. Turkey sandwich? How... original. More often than not, I find myself contemplating the mediocre offerings of the office cafeteria and wondering why I'm spending $7 on another unsatisfying lunch.

How can you fight lunchtime ennui? By making an easy, café-worthy sandwich that's filling, satisfying, and oh-so-tasty.


Mediterranean Eggplant Sandwich

Ingredients
  • 1 focaccia roll
  • 2 large and 2 small frozen breaded eggplant cutlets
  • 3-4 sliced rounds of fresh mozzarella
  • jarred roasted or pickled red peppers
  • 1-2 Tbsp hummus
Directions
Place eggplant cutlets in a toaster oven heated to 425°F for 15 minutes, or until golden brown and cooked through. Slice focaccia roll open and spread hummus on the top half of the roll. Assemble the sandwich by arranging the eggplant slices on the bottom half of roll, adding the mozzarella rounds and red peppers, and topping off with the top half of the roll.


Okay, so a sandwich with breaded eggplant cutlets doesn't seem very Slacker Gourmet, but when they come pre-breaded and frozen from Trader Joe's... that's a whole different ball game. Most of the prep time (the heating time for the eggplant) can be done while you're getting ready for work. Roasted red peppers can be found in the Italian section of the supermarket - I used Pastene garlic red peppers. Tangy and delicious!
Wednesday, March 24, 2010

Chicken Avocado Salad

When temperatures hit 70 degrees on Saturday, my body went into full-on spring food mode. Of course, by the time Wednesday hit, the weather had reverted to 50 and windy. The mind is a powerful thing, though, and cool temperatures weren't going to stop me from my favorite warm-weather Slacker Gourmet meal! It's quick, healthy, and seriously delicious.


Chicken Avocado Salad
Adapted from Healthy & Delicious: Avocado Chicken Salad

Ingredients
  • 3/4 lb. cooked chicken, diced into 1/2 inch cubes
  • 1 large tomato, seeded and chopped
  • 1 Hass avocado, diced
  • 1/2 bunch scallions, chopped
  • 2 Tbsp (or to taste) fresh cilantro, chopped
  • 1 lime
  • Salt and pepper, to taste
Directions
Combine tomato, avocado, scallions, and cilantro in a medium-large bowl and stir gently (the avocado should barely coat the rest of the veggies, but not break down completely). Cut the lime in 2 and squeeze the larger half over the veggies. Squeeze the smaller half of the lime over the chicken, then mix the chicken into the veggie bowl. Taste and season with salt and pepper, if needed. Keep tasting... until you're full. :)


This may seem like a bit of chopping and prepping for a Slacker Gourmet meal, but here are some shortcuts:
  • Use pre-cooked chicken. I know I'm showing the Trader Joe's love again... but they sell frozen, pre-cooked chicken in 1lb bags. 3-4 minutes in the microwave on half power should be enough to fully defrost the chicken without heating it up too much. You can also find pre-cooked chicken in the fridge case in most supermarkets, near the bacon and kielbasas, or use chicken from a cooked rotisserie chicken.
  • Instead of slicing and dicing a large tomato, use cherry tomatoes. You can cut them in half, or even toss 'em in whole.
  • Got a mini food processor? Toss in the cilantro and scallions (make sure to cut off the bad ends first!) together, and give it a few quick pulses.
Monday, March 22, 2010

Southwestern Beer Bread

The Slacker Gourmet loves to bake. The Slacker Gourmet hates measuring out dry ingredients, though. A cup here, a tablespoon there... bah! When I came across Trader Joe's Beer Bread mix, I thought, "Hey, here's some baking I could get behind! Mix, beer, and butter are the only ingredients!" Ah, but I couldn't resist doctoring it up...

... Okay, so I didn't end up making it myself. But I told my hubby what to do with it over the phone... and it turned out quite well! We had it with soup, but I think it would go nicely with chili.

Southwestern Beer Bread

Ingredients
  • 1 box Trader Joe's beer bread mix
  • 12oz beer
  • 1-2 Tbsp butter, melted
  • 1 cup shredded cheese (something sharp, like cheddar or Monterey Jack)
  • 1-2 small cans diced green chiles, drained
Directions
Dump the mix into a bowl, and mix the beer in, stirring until the batter comes together. Add the cheese and chiles and stir until well combined. Pour the mixture into a greased and floured loaf pan, drizzle the melted butter on top, and bake according to the package instructions. Try to let it cool slightly before cutting (so it doesn't break apart) or tearing into with your hands (so you don't burn yourself).


Some notes from our experience:
  • A lighter, less malty beer would probably be better with this. We used Guinness the first time, and I thought it was a bit sweet once baked.
  • The instructions on the box call for a half stick of butter melted and drizzled, but I think that half or even a quarter of that would be fine - I found the bread a little greasy with the full amount.

The Slacker Gourmet - who and why

Once upon a time, my friend/coworker turned to me and said, "If you wrote a cookbook for lazy cooks, I would buy it." Being one of the aforementioned lazy cooks, I laughed a bit at the thought of actually taking the time to write a cookbook - but then the wheels started turning. A cookbook, no... but a blog... perhaps.

Who is The Slacker Gourmet?
A foodie, but a lazy one. Someone who loves creating and cooking, but has a fairly short attention span. Someone who hates washing nearly every utensil in the kitchen after making a single meal. Someone who embraces the crockpot and Trader Joe's** with open arms. Someone who works full time, and may also have a spouse/life partner/roommate who also works full time. Any one of these can qualify you as a Slacker Gourmet. I happen to possess all of these characteristics, and I bet many others are Slacker Gourmets at heart.

Why?
Loving tasty food can be expensive, if you eat in restaurants or get takeout all the time. The Slacker Gourmet adores food that other people make. However, in the interest of saving some money and having a little more control over what goes into his or her mouth, The Slacker Gourmet strives to have an arsenal of recipes with a high deliciousness payoff to low effort investment. Even if The Slacker Gourmet relies on some prepared items (shredded cheese from a bag, pre-cooked chicken, pre-made sauce), he or she is still saving money and creating yummy meals.

So there you have it. From one Slacker Gourmet to another... let's get cooking! (But let's not spend all day on it.)

**Disclaimer: I am in no way affiliated with Trader Joe's - I just shop there a ridiculous amount, as my recipes will show. If you're not lucky enough to live near one... I'm very sorry - but I will have recipes that don't involve TJ's. I promise!