Showing posts with label baking. Show all posts
Monday, April 14, 2014

Macaroons? Cookie Dough Bites? (Gluten-Free, Vegan)

Macaroons? Cookie dough bites? (Project 365: 103/365)

Have you ever gotten halfway through a recipe you found somewhere, and realized there was no way that it was going to work as written? With cooking, it's definitely easier to recover from and make tweaks, but when it's a baked good... well, all bets are off.

This happened to me about a month ago. I had come across a recipe for cashew flour chocolate chip cookies, and even though I had some warning bells going off in my head as I read the recipe, the positive comments convinced me to give it a shot.

Mix together dry ingredients - okay. Add butter - hrmm, no indication of the temperature or state of the butter given. Guess I'll soften it, that's pretty typical for cookies, right? Okay, now I have lumpy flour. Maybe when I add the liquid... liquid... there's no more liquid in this recipe. I guess the butter was supposed to be melted. Uh oh. Now what do I do???

Well, I'm not one to give up, especially when I've psyched myself up for chocolate chip cookies. I added some liquid, more flour, sugar (the original recipe also had no sweetener)... just guessing at amounts, until I had something that resembled a cookie dough. Whew! Let's get these guys onto a cookie sheet and bake 'em up.

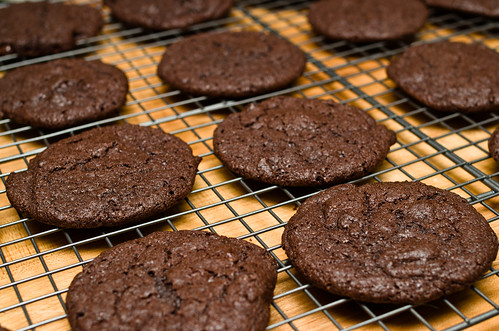
7 minutes in - gee, these look awfully puffy and they're not spreading. I think I'll squish 'em down with a spoon and give them another few minutes.

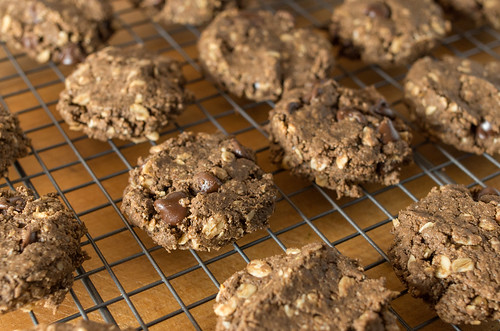
12 minutes - well, these look like they're about as done as they're going to be. Yikes.

Failcookies (Project 365: 59/365)

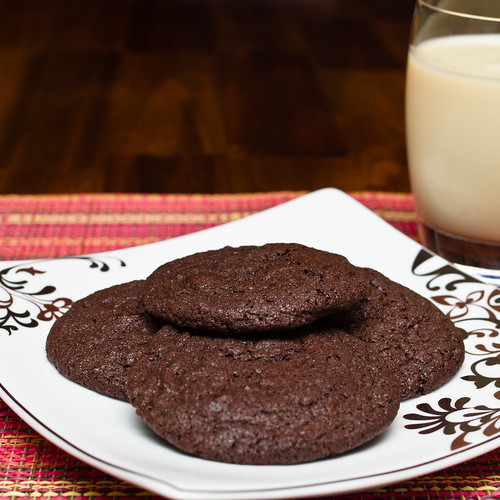
Hey, even though they look like they fell off the ugly tree and hit every branch on the way down... they tasted good! I fed them to my husband, who thought they had a similar texture to macaroons. Macaroons. I can get behind that.

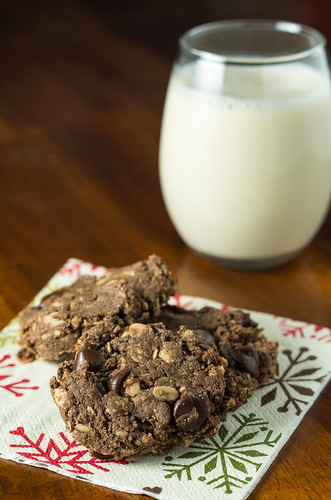
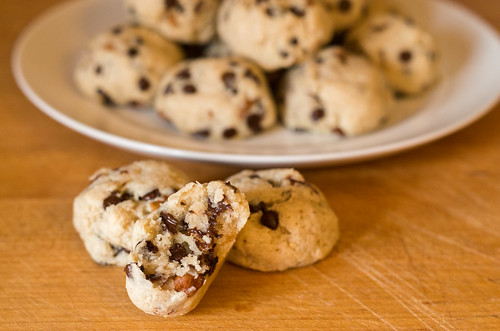
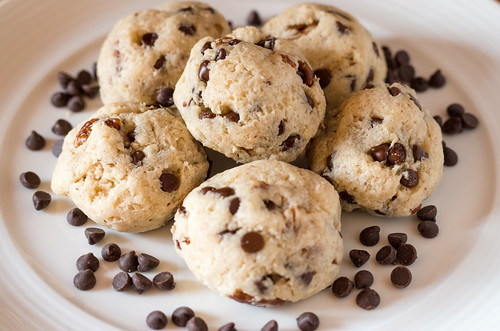
The next time I made them, I decided to use coconut oil instead of softened Earth Balance to enhance the macaroon-iness of them. Coconut flavor without the chewy coconut bits, for those who don't care for that texture. I also rolled the dough into balls for baking and did NOT flatten them with a spoon this time.

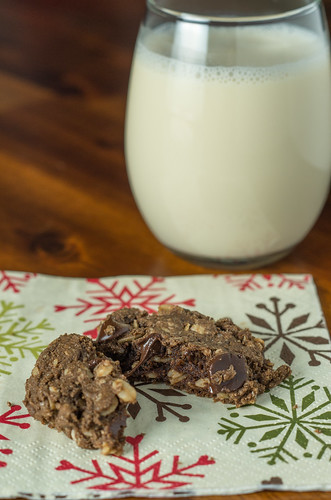
Hooray! They looked more like macaroons this time. But - to further confuse matters, my husband said that he felt like he was eating cookie dough, but in a good way. Cookie dough bites? I can also get behind that.

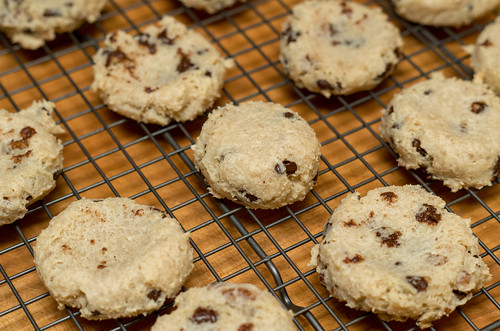
This is my long-winded way of saying, this is a gluten-free, vegan treat that is having a slight identity crisis. Make the dough balls a little bigger (1.5" diameter) if you want to call them macaroons. Make 'em a little smaller (1" diameter or even a little smaller) if you want to call them cookie dough bites. Don't like coconut? Use softened butter or margarine instead of coconut oil. Mix in whatever other chocolate or nuts or dried fruit you want.

Just don't flatten them with a spoon.

Macaroons? Cookie dough bites?

Macaroons or Cookie Dough Bites
Makes approximately 20 2" macaroons, more if you make them smaller

Ingredients
  • 1 cup gluten-free AP flour OR regular AP flour
  • 1 cup nut meal (I used cashew meal - almond meal should also work!)
  • 1/4 cup sugar
  • 1 tsp baking powder
  • pinch of salt
  • 1/3 cup coconut oil, room temperature OR 2/3 stick butter, softened
  • 1 tsp vanilla
  • 1/2 cup non-dairy milk OR dairy milk
  • 1 cup mix-ins (I used 1/2 cup chopped pecans and 1/2 cup mini chocolate chips)

Directions
Preheat oven to 350°F. Line a couple of cookie sheets with parchment paper.

Mix together flour, nut meal, sugar, baking powder and salt in the bowl of your stand mixer until combined. Add coconut oil or butter and beat on medium speed until the dry ingredients look like they have small lumps evenly distributed throughout. 

Mix vanilla and milk together. While running the mixer on a low speed, slowly pour milk mixture into the bowl - the dough should come together. Add mix-ins and mix until just combined.

Roll dough into balls (1" balls for 2-bite treats, 1.5" balls for 3-bite treats) and place a couple of inches apart on the prepared cookie sheets. Bake for 9-10 minutes for smaller treats, or 10-11 minutes for larger treats. If they don't feel tacky to the touch on top and they're slightly firm, they're done - they won't brown much. Remove from oven and let cool on the cookie sheets for 5 minutes, then move them to a cooling rack.

Print this recipe!
Tuesday, March 4, 2014

Maple Nut Oatmeal Cookies

Maple Nut Oatmeal Cookies (Project 365: 62/365)

Our oldest kitty, Oliver, hasn't been feeling quite like himself for awhile. Even after many vet visits, he ended up at the emergency vet for a couple of nights this past weekend. I don't want to get into too many details about what's wrong, but he came home with a feeding tube for meals for now. This has resulted in me making what can only be described as a "liver milkshake" in smell and texture out of canned food and water, for pumping into the feeding tube. Yummy.

Partially to distract myself from worrying about Ollie, and yes, partially to eradicate the lingering odor of his dinner, I set out to make some more oatmeal cookies. As much as I adore my double chocolate peanut butter oatmeal cookies (known as DCPBOC from here on out), I wanted to make something with a completely different flavor profile. I wanted to use the same basic recipe, with the building blocks of nut butter, oats and gluten-free flour giving the same soft-but-toothsome texture, so I settled on making a maple nut oatmeal cookie.

Maple Nut Oatmeal Cookies

The recipe is quite similar to the DCPBOC - almond butter instead of peanut, grade B maple syrup (for a distinct but not overwhelming maple flavor) instead of brown sugar, extra flour and less milk, and pecans instead of chocolate chips. The resulting cookies, based on my initial guesses at amounts for substitutions, were everything I hoped for - maybe more! Salty, sweet, nutty... just like me.

As with the DCPBOC, I made these gluten-free and vegan, but regular all-purpose flour and dairy milk should work just fine here. Even though we don't typically eat vegan in our house, I love making eggless cookies because I can rationalize "taste-testing" a lot more cookie dough without raw eggs giving me pause. So go ahead - let your kiddos and your grandmothers grab a spoon and eat the dough too - I won't tell.

Maple Nut Oatmeal Cookies

Maple Nut Oatmeal Cookies
Yield: approximately 2 dozen 2" cookies
Adapted from Double Chocolate Peanut Butter Oatmeal Cookies

Ingredients
  • 1 cup almond butter (9 oz by weight)
  • 1/2 cup grade B maple syrup (if you dare to use pancake syrup, we can no longer be friends)
  • 2 tsp vanilla extract
  • 1 cup gluten-free AP flour OR regular AP flour
  • 1 cup rolled oats
  • 1 tsp baking soda
  • 1/2 tsp kosher salt
  • 1/4 cup non-dairy milk OR dairy milk
  • 3/4 cup chopped nuts (I used pecans, but walnuts, almonds or hazelnuts would also be nice)
Directions
Preheat oven to 350°F. Line a couple of sheet pans with parchment paper.

Add almond butter and maple syrup to the bowl of your stand mixer, and beat on medium speed until well combined (2-3 minutes). Add vanilla extract and beat until mixed in.

Stop the mixer. Add the flour and mix on a low speed until just combined. Stop the mixer again, add oats, baking soda, and salt and mix again on low speed until just combined.

The dough at this point should be somewhat crumbly and sticky. With the mixer running at a low to medium speed, add the milk in a thin stream. By the time you finish adding the milk, the dough should come together and pull away from the sides of the bowl.

Stop the mixer, remove the bowl and mix in the chopped nuts with a spoon. Using a cookie scoop (I used my OXO Good Grips Medium Cookie Scoop) or 2 spoons, drop rounded tablespoonfuls of dough a couple inches apart on the prepared sheet pans. If you're using a cookie scoop - don't overfill it - this dough is pretty sticky and thick, so you don't want to overtax the spring release mechanism. Flatten them out to about 1/4 inch thick with the palm of your hand - they won't spread much in the oven.

Bake for 9 - 10 minutes (11 minutes in my oven, but I tend to always need another minute past the upper bound of recipe times) - the tops of the cookies should look slightly dry and may be starting to just barely crack in places. Remove from the oven and let cool on the pans for 5 minutes, then transfer the cookies to a cooling rack to finish cooling. Enjoy with a glass of milk, or with more cookies.

Print this recipe!

Maple Nut Oatmeal Cookies
Tuesday, February 11, 2014

Double Chocolate Peanut Butter Oatmeal Cookies

Double chocolate peanut butter oatmeal cookies

Hello, fellow lazy foodies! After an extended spell of putting the slacker in Slacker Gourmet, I'm back! Don't worry, I hadn't forgotten about this humble little corner of the food blogosphere.

What have I been up to? Well, here's the thing. A few months ago, my husband was diagnosed with a whole slew of food intolerances, including gluten, wheat, rye, yeast and casein. The doctor put him on a strict elimination diet to avoid all of the trigger foods, which ended up lasting 3 months (right through the holiday season - yikes!). So I was cooking, all right, but much of it was far from Slacker Gourmet - there was a lot of experimentation and substitution. For the most part, I stuck with recipes that other, far smarter, bloggers and chefs had developed.

The hubby is off the elimination diet now, but has discovered that he does indeed feel better when he avoids dairy and gluten most of the time. Since this is now a part of our everyday lives, I've started to adapt and streamline recipes to fit into our busy schedules, and I'm looking forward to sharing them! I've also restarted Project 365, so I'm taking more and more photos (and learning how to take proper food photos). Now that I keep my camera close to me at all times, it's much easier for me to remember to grab a few photos of something I've made so I can write about it! I'm hoping to settle into a weekly update schedule eventually.

Anyway... enough about me! Let's talk about cookies, shall we?

I'm not much of a baker to begin with, but add in the constraint of staying gluten-free and dairy-free, and I'm ready to just break out the box mixes and be done with it. However, there were some recipes that the hubby really loved that I wanted to try to adapt. In general, the less reliant a baked good was on flour, the better chance I had of adapting it successfully.

One of the recipes that worked really well was this recipe for Healthy Peanut Butter Chunk Oatmeal Bars. It was already dairy-free, so I only had to use gluten-free oats and swap in a gluten-free AP flour blend (I've been using Namaste), and it worked beautifully.

There are a couple of drawbacks, though. When I make bars, brownies, etc., I really love using my Chicago Metallic Slice Solutions Brownie Pan - it's got the convenient sling to lift the bars out, and the cutting grid gives me beautiful bars every time (if I try to cut them myself, I inevitably end up with a crumbly mess). But the darn thing is a pain to grease (even though it's nonstick, i don't trust it that much), and even more of a pain to wash.

The bars themselves are also pretty serious. They're thick and filling, which is great sometimes, but not always what you're looking for. I've taken to cutting them in half from the original bar size, but... see above about the crumbly mess. Yeah.

I got to thinking - can I adapt these into cookies instead? Parchment-lined cookie sheets don't need to be washed (usually). If I could make cookies... then all of my equipment could go into the dishwasher. Plus, I could make them a little more manageably sized. For cookies, though, I was afraid that the amount of flour in the bars would make for a crumbly, dry cookie, so I swapped out 1/4 of it for raw cacao powder.

The results? A resounding success, I'd say! These cookies come together quickly with a stand mixer - you can have these mixed, baked, and cooled in well under an hour. They're also perfect for nearly any food restriction (well, except for a peanut or chocolate allergy) - no one would be able to tell that they are gluten-free or vegan unless you tell 'em. Plus, you can go ahead and eat the uncooked dough - no raw eggs to worry about!

Double chocolate peanut butter oatmeal cookies


Double Chocolate Peanut Butter Oatmeal Cookies
Yield: approximately 2 dozen 2" cookies
Adapted from Healthy Peanut Butter Chunk Oatmeal Bars

Ingredients
  • 1 cup peanut butter (see below for measuring tips)
  • 1/2 cup brown sugar
  • 2 tsp vanilla extract
  • 3/4 cup gluten-free AP flour OR oat flour OR whole wheat flour
  • 1/4 cup raw cacao powder OR cocoa powder
  • 1 cup rolled oats
  • 1 tsp baking soda
  • 1/4 tsp kosher salt
  • 1/2 cup non-dairy OR dairy milk
  • 1 cup semi-sweet or dark chocolate chips (check the label to make sure they fit in with any food restrictions) 

Directions
Preheat oven to 350°F. Line a couple of sheet pans with parchment paper.

Add peanut butter and brown sugar to the bowl of your stand mixer, and beat on medium speed until light and fluffy (2-3 minutes). Add vanilla extract and beat until mixed in.

Stop the mixer. Add the flour and cacao powder, and mix on a low speed until just combined. Stop the mixer again, add oats, baking soda, and salt and mix again on low speed until just combined. Stopping and starting the mixer keeps you from throwing the dry goods all over the kitchen - don't ask me how I know that.

The dough will look very dry and crumbly now - that's okay! With the mixer running at a low to medium speed, add the milk in a thin stream. By the time you finish adding the milk, the dough should come together and pull away from the sides of the bowl.

Stop the mixer, remove the bowl and mix in the chocolate chips with a spoon. Using a cookie scoop (I used my OXO Good Grips Medium Cookie Scoop) or 2 spoons, drop rounded tablespoonfuls of dough a couple inches apart on the prepared sheet pans. Smush 'em down a little bit - they won't spread much in the oven.

Bake for 10 - 12 minutes (13 minutes in my oven, but I tend to always need another minute past the upper bound of recipe times) - the tops of the cookies should look slightly dry and may be starting to just barely crack in places. Remove from the oven and let cool on the pans for 5 minutes, then transfer the cookies to a cooling rack to finish cooling. Try not to eat all of them in one sitting.

Print this recipe!


Let's discuss the elephant in the room - peanut butter.

I hate measuring peanut butter. Even with a handy little plunger-style measuring cup (like this one from OXO), it's still a sticky mess. I've found a couple of ways to lessen the pain, though.

If you have a kitchen scale, a cup of peanut butter is 9 oz by weight, so you can just put your stand mixer bowl on the scale, zero it out, then scoop 9 oz right into the bowl. In fact, go right ahead and add 3 5/8 oz of brown sugar in there too - now you don't have to pack it into a measuring cup!

My other sneaky peanut butter measuring trick? Well, most jars of peanut butter are 16 oz, which is not quite 2 cups. But Whole Foods sells their peanut butter in 18 oz jars, which is exactly 2 cups. If you want to be really efficient, go ahead and make a double batch of cookies (though I will warn you that you will be pretty much at max capacity in the classic 4.5 qt KitchenAid mixer).

Double chocolate peanut butter oatmeal cookies
Thursday, November 15, 2012

Baking: Turning Quick Bread Mix into Chewy Cookies

Baking experiment

As the holidays approach, all sorts of festively flavored quick bread mixes have started gracing the supermarket shelves. Pumpkin, gingerbread spice, cranberry-walnut, chocolate peppermint... the list goes on and on. The problem is, I don't want a loaf of bread, I want fresh-out-of-the-oven cookies. 

As I've mentioned before, baking is not this Slacker Gourmet's forte. I love some homemade sweet treats as much as the next person, but I have very little patience for measuring out and sifting dry ingredients. Boxed cookie mixes don't come in the most exciting flavors, however, all of the yummy seasonal varieties of quick breads sound like they'd make excellent cookies. But how can we convert the quick bread mix into a successful cookie recipe? 

I took a look at homemade quick bread recipes, and made a mental note of the proportions of the major dry ingredients (flour, leavener(s), salt, sugar*) for one loaf. Then I looked up a few recipes for chewy cookies (since that was the texture I was hoping for), and checked out the proportions of dry ingredients for those. 

It turned out that the dry ingredient ratios were very similar between the 2 different types of recipes (quick breads seem to have a little bit less sugar, though). The amount of dry ingredients called for in a quick bread recipe yielding one loaf was the same amount called for in cookie recipes that yielded approximately 2 dozen good-sized cookies. The question was, could I add the dry ingredients from the quick bread mix to the same amount of wet ingredients from the cookie recipe (in this case, 2 eggs and 2 sticks of butter), and get cookie dough?

Cookies are typically made by the creaming method, in which you cream (mix) together butter and sugar until it's light and fluffy, then slowly incorporate the eggs. Once the eggs are in the mix, the dry ingredients get added slowly, just until the dough comes together. However, the quick bread mix already had sugar in it, but since quick breads are not quite as sweet, I added a couple of tablespoons of sugar to the butter to help it get even lighter and fluffier. Is it necessary? I'm not 100% sure, but it didn't hurt matters here. 

Once the dough came together, it seemed like it was indeed a cookie dough - maybe a little softer than I'd thought it would be. Chilling in the fridge for an hour or two could improve the texture. I was impatient, though, so I forged ahead and dished out 1 1/2 tablespoon portions with my handy-dandy cookie scoop onto my prepared cookie sheets, slightly doubtful that this would actually work.

20 minutes later, after baking and cooling, I ended up with...

Experimental cookies (Project 365: 241/365)

It worked beautifully! Chewy, chocolate-y and minty, these were some darn tasty cookies! 3 days later, we're still eating them, and they're still chewy and delicious.

Experimental cookies

Chewy Cookies (made from a quick bread mix)
Approximate yield: 2 dozen 2 3/4 inch cookies

Ingredients
  • One box of quick bread mix (meant to yield one loaf)
  • 2 eggs
  • 1 cup (2 sticks) butter, softened (cut up and microwaved on high for 20 seconds does the trick)
  • 2 tablespoons sugar
  • 1 cup nuts, chocolate chips, or other mix-ins (optional)

Directions
Preheat oven to 350°F. Line 2 cookie sheets with parchment paper.

Cream together butter and sugar in a stand mixer or with an electric hand mixer, until light and fluffy (about 2-3 minutes). Add eggs one at a time, beating well after each egg.

Slowly add the quick bread mix in batches, until the dough just comes together (scrape down the sides of the bowl as necessary). If using mix-ins, gently stir them in after the dough is fully mixed.

Drop dough by rounded tablespoonfuls (although really, the cookie scoop will make your life easier) on the prepared cookie sheets, leaving a couple of inches in between each cookie.  Bake for approximately 10-12 minutes (begin checking them around 8 minutes). Remove from oven and let cool on cookie sheets for 10 minutes, then move them to wire racks to cool completely... or move them to your mouth. 


I'd originally planned to experiment with 2 different types of quick bread mix. Sadly, the bag of pumpkin mix met an untimely end on the kitchen floor, so that experiment will have to wait until I return to Trader Joe's. I have a good feeling about further experimentation, though!

*Yes, I know sugar is typically considered a wet ingredient in baking, but since it is already incorporated in the quick bread mix, I needed to consider it as a dry ingredient for this experiment. Back to where I left off...
Monday, March 22, 2010

Southwestern Beer Bread

The Slacker Gourmet loves to bake. The Slacker Gourmet hates measuring out dry ingredients, though. A cup here, a tablespoon there... bah! When I came across Trader Joe's Beer Bread mix, I thought, "Hey, here's some baking I could get behind! Mix, beer, and butter are the only ingredients!" Ah, but I couldn't resist doctoring it up...

... Okay, so I didn't end up making it myself. But I told my hubby what to do with it over the phone... and it turned out quite well! We had it with soup, but I think it would go nicely with chili.

Southwestern Beer Bread

Ingredients
  • 1 box Trader Joe's beer bread mix
  • 12oz beer
  • 1-2 Tbsp butter, melted
  • 1 cup shredded cheese (something sharp, like cheddar or Monterey Jack)
  • 1-2 small cans diced green chiles, drained
Directions
Dump the mix into a bowl, and mix the beer in, stirring until the batter comes together. Add the cheese and chiles and stir until well combined. Pour the mixture into a greased and floured loaf pan, drizzle the melted butter on top, and bake according to the package instructions. Try to let it cool slightly before cutting (so it doesn't break apart) or tearing into with your hands (so you don't burn yourself).


Some notes from our experience:
  • A lighter, less malty beer would probably be better with this. We used Guinness the first time, and I thought it was a bit sweet once baked.
  • The instructions on the box call for a half stick of butter melted and drizzled, but I think that half or even a quarter of that would be fine - I found the bread a little greasy with the full amount.