Showing posts with label food processor. Show all posts
Monday, May 5, 2014

No-Bread Romesco Sauce (Gluten-Free, Paleo)

Romesco sauce

Here in Massachusetts, it's finally spring with some consistency. Of course, we still have the occasional "surprise! It's 40 degrees and raining while you have to be outdoors in dressy clothes" day, but for the most part, the sun is shining and birds are chirping.

I don't know about you guys, but when the weather gets warmer, our dinners get pretty basic. The grill gets a lot more use and we start having more simple grilled meat and veggie dinners. Things like grilled chicken, however, are not terribly interesting on their own (even when it's made really well).

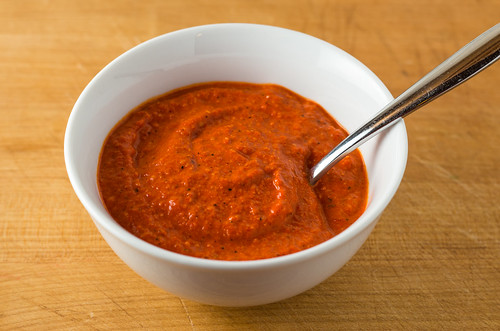
Enter this Romesco sauce. A smoky, garlicky concoction that originated in Spain, Romesco sauce is super easy to make if you have a food processor. My version eliminates the traditional slice of bread as a binder (blah blah gluten-free blah blah) and uses jarred roasted red peppers to cut down on the prep work, because... well, have you read the name of my blog?

Roasted garlic is still a key component, and it's not hard to do the traditional way. However, I have a few suggestions to cut down on the work.

One - go ahead and use your toaster oven. That way, you don't have to heat your whole kitchen on a hot day just for this.

Two - just bundle everything up in a piece of foil and stick it in the oven for minimal cleanup!

Three (this is the big one, and Italian grandmothers everywhere are probably cursing my name) - use pre-peeled garlic cloves! Around here, I can think of 3 stores that sell pre-peeled cloves: Trader Joe's, Wegmans (both TJ's and Wegmans come in bags with sealed pouches of 10 or so cloves) and Stop and Shop (they have a jar of peeled cloves in the produce section). If you roast the already-peeled cloves, you get to skip the annoying step of fishing out hot, squishy cloves from a whole roasted head of garlic.

Once the garlic is roasted, then everything takes a spin through the food processor, and voila! A big ol' batch of Romesco sauce. I guarantee you'll be able to carry it through at least 3 different (two-person) meals in one week.

Burger with cheddar and Romesco sauce

This is how we used one batch of Romesco sauce:
  • Topped plain grilled chicken breasts with it
  • Tossed it with penne, cut-up leftover grilled chicken, a bit of reserved pasta water, and goat cheese crumbles (we did this two different nights, in fact!)
  • As a burger condiment
How else could you use it?
  • As a topping for other plain, grilled meats and seafood; it would go really well with steak and fish
  • Spread it on toasted baguettes slices, top with goat cheese crumbles and broil them to brown the tops for an appetizer 
  • As a dip for pita chips
  • Tossed with roasted veggies or spaghetti squash
If you have a favorite use for Romesco sauce, let me know in the comments!

Chicken with Romesco sauce
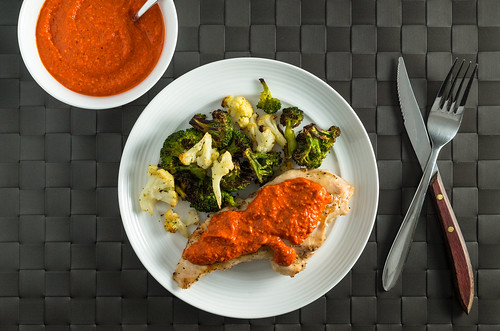
Hey look, there are some Frozen Roasted Vegetables on the side!

No-Bread Romesco Sauce (Gluten-Free, Paleo)
Makes 2 cups

Ingredients
  • 1 small head (or 10 peeled cloves) of garlic 
  • 1 large jar (15-17 oz, depending on the brand) roasted peppers packed in water, drained
  • 1/2 cup almonds
  • 1/2 teaspoon smoked paprika
  • 1 tablespoon red wine vinegar or lemon juice
  • 1/4 cup olive oil
  • Salt to taste

Directions
Preheat oven or toaster oven to 450°F. Tear out a square of aluminum foil. 

If roasting a whole head of garlic, slice the top 1/4"-1/2" off with a sharp knife. Drizzle with olive oil and sprinkle with salt. Place in the middle of the foil piece and bundle it up. Put it in the oven and roast for 20-30 minutes, or until the cloves are easily pierced with a fork. Let it cool down, then remove the cloves.

If roasting already-peeled cloves of garlic (this is how I roll, because it's much easier), place the cloves in the middle of the foil piece, drizzle with olive oil, and sprinkle with salt. Bundle it all up and shake it up a bit to coat all of the cloves with oil. Roast them in the oven for 20-25 minutes, or until the cloves are soft.

Place the garlic, drained roasted peppers, almonds, smoked paprika, and red wine vinegar (or lemon juice) in the bowl of your food processor. Process it for a minute or two, until everything is pureed. You may need to stop the processor and scrape down the sides once.

With the processor still running, slowly drizzle in the olive oil. Most (if not all) food processors have a small hole in the feed tube plunger that's meant for this - you can just dump all of the olive oil in there, and let gravity do the work of slowly drizzling it in through the hole. Once all of the oil is incorporated, stop the processor, taste the sauce, and mix in salt to taste (I usually add a couple of pinches).

Print this recipe! 
Sunday, February 23, 2014

Recipe Shout-Out: Chocolate Hazelnut Coconut Fudge

Fauxdge (Project 365: 36/365)

While looking for easy recipes for gluten- and dairy-free sweet treats a few weeks ago, I came across something that sounded too good to be true: creamy, rich vegan fudge made with only 5 ingredients (6 if you count the fleur de sel sprinkled on top). I had all of the ingredients on hand though, so I gave it a try.

Guess what? It was every bit as good as the original recipe promised! "Real" fudge has a slight sugar-graininess that I don't love, but this "fauxdge" had a smooth, almost truffle-like texture. I also really liked that it isn't super-sweet, but it's very chocolate-y. It came together quickly in my trusty food processor - the only hard part was waiting for it to set up in the fridge.

I've got some plans for experimenting with some other flavor combinations - if I come up with something brilliant, I'll write about it! For now, though, you should give the original recipe a try, because you can't really go wrong with chocolate, coconut and hazelnut (well, unless you're allergic, in which case, I'm sorry!).

Get the recipe: Crazy Delicious Dairy-Free Chocolate Fudge from Oh My Veggies
Saturday, June 23, 2012

Food Processor/Stick Blender: Easy Olive Tapenade

Have you ever found yourself in one of these all-to-familiar situations?
  • Eating a piece of plain grilled chicken or fish and wishing you could jazz it up?
  • Making a sandwich and discovering that you're out of mayo and mustard?
  • Putting out crackers or sliced baguettes for company, but missing just one more spread for them?
Well, there are certainly many solutions for each situation. But what if I told you there was one recipe that could fix all of those problems, and more, in one fell swoop?

Enter olive tapenade. From Wikipedia:
Tapenade is a Provençal dish consisting of puréed or finely chopped olives, capers, anchovies and olive oil. Its name comes from the Provençal word for capers, tapenas.
Well, doesn't that sound fancy! However, your Slacker Gourmet alarm bells are probably going off. Finely chopped? Capers? ANCHOVIES? Breathe, people! Let's break this down:
  • You don't have to chop anything up into itty bitty pieces, as long as you have a food processor or stick blender. Traditionally some tapenades were made with a mortar and pestle - we're definitely not going down that road either. 
  • Yes, capers are one of those items you've typically bought for one recipe and one recipe only. They usually come in expensive little jars, of which you use 7/8ths for the aforementioned recipe. But - if you find yourself at Trader Joe's or an Italian grocery (not just a specialty shop), they sell capers in larger jars, and if you keep 'em in the fridge in their brine, they last for quite awhile. If you have them around on a regular basis, you'll find yourself using them in pasta/grain salads, stews, chicken sautés, or anything that needs a briny kick. However, if you still don't want to buy them, they are NOT essential to my quick tapenade recipe (which I suppose would technically make it an olive relish instead, but whatever). 
  • Anchovies? So not necessary. If you happen to have them around, sure, go ahead and throw a fillet in, but there's no reason to go out and buy them. 
What kind of olives should you use? Well, that's a matter of personal preference. I do recommend using a mix of a couple different kinds of olives if you're not using capers. Buy them pitted, since, well, this is the Slacker Gourmet. You don't necessarily have to get them from the fancy olive bar in nice supermarkets; there are many perfectly nice jarred olives out there. The only guideline I personally have is: if it comes in a can, it's really not appropriate for tapenade.

A little more explanation on the puréeing technique: typically a food processor is the easiest tool for the job. But - this recipe only makes a cup or so of tapenade, so if you have a 14-cup food processor and can't find your little mini processor, it's definitely not worth getting the big processor dirty if you have a stick blender.

Homemade olive tapenade (Project 365: 87/365) 

Easy Olive Tapenade
Makes 1 - 1 1/2 cups

Ingredients
  • 1 1/2 cups pitted olives, rinsed (this is important!) and divided (any kind, or a mix - see notes above) 
  • 2 tablespoons capers (optional - use a mix of olives if not using)
  • 1 whole clove garlic 
  • 1/2 - 1 tablespoon fresh parsley, basil, or oregano (optional)
  • 1/2 - 1 tablespoon lemon juice or red wine vinegar 
  • 2 tablespoons olive oil
  • Fresh cracked black pepper

Directions

Food Processor:
Combine 1 cup olives, capers (if using), garlic, herbs (if using), and 1/2 tablespoon lemon juice or red wine vinegar in the food processor bowl. Pulse until all components are between chunky and finely chopped. Drizzle olive oil in while processing until the mixture comes together and looks almost like a paste. Add the reserved 1/2 cup of olives and pulse until the new addition is coarsely chopped - this will add some extra texture. Taste and add the additional 1/2 tablespoon of lemon juice/vinegar if necessary, and stir in pepper to taste.

Stick Blender:
In the smoothie cup that comes with your stick blender, or a medium bowl, combine 1 cup olives, capers (if using), garlic, herbs (if using), and 1/2 tablespoon lemon juice or red wine vinegar. Hit it with the stick until the texture is between chunky and finely chopped. Add the olive oil all at once, and hit it with the stick again, until the mixture looks like a rough paste. Add the reserved 1/2 cup of olives and give it another hit with the stick until those olives are coarsely chopped and the tapenade looks like it has a variety of textures. Taste and add the additional 1/2 tablespoon of lemon juice/vinegar if necessary, and stir in pepper to taste.


Okay, now you have tapenade, and it should keep for at least a week in the fridge. Now, what can you do with it?
  • Use it as a relish for grilled chicken or fish. 
  • Slather it on raw chicken or fish, wrap in parchment paper or foil, and bake for 15 minutes (thin cuts of fish), 20-25 minutes (thicker cuts of fish), 30-40 minutes (chicken) at 350 degrees.
  • Use as a delicious sandwich spread (especially on a Mediterranean-inspired sandwich)
  • Spread it on baguette slices or crackers for an elegant appetizer. If you want to jazz up the spreading platform, brush baguette slices with garlic olive oil and toast in the oven or toaster oven until golden brown.
  • Toss it with cooked pasta and top with a sprinkle of Parmigiano-Reggiano for a quick meal or side dish.
  • My mother, a dyed-in-the-wool New Yorker, once suggested using tapenade as a non-dairy/non-fish spread alternative to cream cheese and lox - and let me tell you, it's darn tasty! You get that nice saltiness without the fishiness, which is a huge bonus for my smoked-salmon-hating hubby.
Easy, savory, and versatile - the perfect Slacker Gourmet condiment.