Showing posts with label lunch. Show all posts
Sunday, June 24, 2012

Chicken Avocado Salad, Revisited


So, once upon a time (read: for the past few summers), the hubby and I both had a love affair with Chicken Avocado Salad. I mean, seriously. It was basically deconstructed guacamole with chicken - what's not to love?

But then... disaster struck. More specifically, the hubby gradually realized that he had developed a tomato allergy. No more chicken avocado salad? Whatever would we do on those hot, sultry nights where we needed a legitimate cover for eating guacamole with a fork?

Summer hit with a vengeance in Massachusetts this week, and as usual, my thoughts turned to the beloved chicken avocado salad. Was it possible to swap the tomatoes out for something equally delicious, but in a completely different way? A quick Google search later, and I had cobbled together a recipe that, quite frankly, beat the pants off the original incarnation. And it took me, my cluttered kitchen and my pathetic knife skills only 30 minutes to put it all together. 


Chicken Avocado Salad: The Tomato-less Version
Makes 3-4 servings
Adapted from Avocado Chicken Salad and Chicken and Avocado Salad

Ingredients
  • 3/4 pound cooked chicken breast, cut into bite-sized pieces *
  • 1/2 pound frozen corn, thawed but not hot **
  • 1 14oz can black beans, drained and rinsed
  • 1 large avocado or 2 small avocados, diced
  • 3 scallions, white and green parts sliced
  • a handful (about 1/4 cup) of cilantro, chopped
  • 2 limes
  • 3 tablespoons olive oil
  • Salt and pepper to taste
Directions
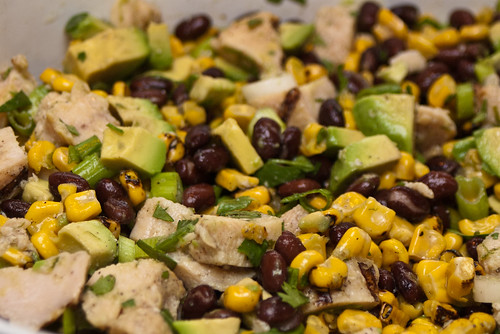
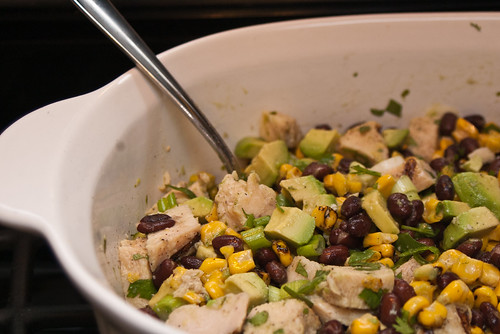
Combine chicken, corn, beans, avocados, scallions and cilantro in a large bowl. Zest (using a microplane if possible - it's much less frustrating than a zester) and juice limes into a small bowl and add the olive oil. Whisk together (or use a fork, it's easier) until it looks like a dressing, and dump it into the big bowl with everything else. Mix it all together with a big spoon. Taste and add salt and pepper, if needed.

* I used Trader Joe's frozen grilled chicken.
** 3 minutes in the microwave on 50% power did it for me. I used Trader Joe's frozen Fire-Roasted corn - highly recommended!


Another beautiful thing about this salad - if you decide you want this taste of summer in, say, November, black beans and frozen corn never go out of season, unlike tomatoes. And sometimes, we all need a little summer in the middle of cold November rain.
Tuesday, January 25, 2011

Pasta e Ceci

Another day, and more snow in New England. Sure, this time it was only an inch or so, but after yesterday's below-zero lows, I'm not eager to go outside.

Of course, this leads to a catch-22. There isn't much food in the house, so I need to go grocery shopping. But... I can't face the outdoors without something warm and hearty in my belly. So what's a Slacker Gourmet to do? Turn to Google, pull out various cans, jars, boxes and frozen foods, and in less than 1/2 hour, sit down to a filling bowl of comfort food (with enough leftovers for the next couple of days for lunch - bonus!).

Pasta e ceci sounds chic, but it's simply a quick stew comprised of pasta and chickpeas in a tomato base. Everyone seems to have their own recipe - I favored one that I found that treated the liquid base as more of a pasta sauce than a soup. The sprinkling of cheese at the end is purely optional; the sauce is plenty thick without it.

Pasta e ceci


Pasta e CeciServes 4
Based on Pasta e Ceci (Pasta With Chickpeas)

Ingredients

  • Olive oil for sautéing
  • 1 small onion, diced (I used frozen diced onion)
  • 2 cloves garlic, minced (I used minced garlic from a jar)
  • 1 tsp dried crushed rosemary or 1 Tbsp fresh rosemary, minced (I used dried)
  • 1/2 tsp red pepper flakes
  • 1 14oz can diced tomatoes with the juice
  • 1 15oz can chickpeas, drained and divided
  • 1 cup water
  • 1/2 pound small pasta (I used ditalini, elbow macaroni or smaller penne/rigatoni varieties would be good)
  • Salt and pepper to taste
  • Parmesan or Romano for garnish (I used Romano)

Directions
Heat oil in a soup pot. When it shimmers, toss in onion and garlic and sauté until onion is soft. Add rosemary and stir around for another minute. Add tomatoes and their juice, red pepper flakes, and salt (I started with 1/2 tsp here), and simmer until tomatoes soften. Add 1 cup of the chickpeas, reserving the rest for later, and the cup of water, and simmer until heated through. Once the chickpeas are heated, purée the contents of the pot until smooth. Add remaining chickpeas, taste and correct seasoning (I added another sprinkle of salt and some pepper) and keep warm until pasta is cooked.

Meanwhile, boil salted water and cook pasta to al dente - it will suck up the liquid in the sauce and soften further. Drain and toss with the sauce and chickpeas. Serve with a sprinkle of Parmesan or Romano.


Puréeing the tomato-chickpea mixture transformed the humble ingredients into a thick, rich, creamy sauce - without any dairy whatsoever! Next time, I may add an additional can of chickpeas to the finished sauce, as I found myself wanting more of them. Also, I believe the pasta could be simmered directly in the sauce with the addition of extra water - another thing to try next time.
Wednesday, November 10, 2010

Ugly but Delicious: Green Eggs and Rice

When it gets cold out, I want hearty, warm breakfasts to start my day. But now that I'm home all the time, I have to make the warm breakfast for myself, and breakfast sandwiches every day probably aren't the healthiest plan.

A couple of mornings ago, I surveyed the fridge for likely breakfast candidates. Eggs, cheese, green salsa, leftover brown rice... somehow, combining all of those seemed like the right thing to do. And... it was. It looked, quite frankly, hideous in the bowl, but it was so comforting and filling, I didn't care. No pictures for this - I didn't think this would photograph particularly well.

Green Eggs and Rice
Serves 1

Ingredients

  • about a cup of salsa verde (green salsa)
  • 2 eggs
  • about a cup of cooked brown rice
  • a heavy sprinkle (probably small handful) of shredded cheese (I used a Colby/Monterey Jack blend)

Directions

Pour salsa into a smallish non-stick frying pan over medium heat. When salsa begins to bubble, kick the heat down to medium-low, and crack the eggs into the salsa. Cover (or not - I didn't bother) and cook until the egg whites are just barely set, and yolks are still runny (if it looks just a touch underdone in the pan, it'll be done in the bowl).

Meanwhile, while the eggs are cooking, heat up the rice, and dump into a bowl. When the eggs are done, glop the whole mess on top of the rice, top with shredded cheese, and mix well.


YUM.The egg yolk, cheese, and salsa mix together into a wonderfully creamy and tasty sauce for the rice... it's like a breakfast stew. It may be ugly, but it's good, decently healthy, and filling, and sometimes, that's all you need.
Saturday, October 2, 2010

Mexican Poached Eggs

Who here likes making big full dinners after work?

Don't all raise your hands at once.

Well, for the 100% of us who don't want to spend the entire night dealing with dinner, here's a dish that is practically the embodiment of the Slacker Gourmet philosophy.
  • It's quick - about 15 minutes from start to finish.
  • It's easy - if you can open a can, open a jar, and crack an egg, you have the necessary skills to make this.
  • It's versatile - it works equally well for breakfast, lunch, or dinner.
  • It's cheap. Like, really cheap. You probably have 3 out of the 4 ingredients on hand already.
  • It's really satisfying. It may not look too pretty, but after a full day at work, it's the perfect warm, tasty, and healthy meal.
This is very loosely inspired by the Italian dish Eggs in Purgatory, which was one of those eye-opening epiphany recipes for me - namely, "Hey, I can poach eggs in flavorful liquids, not just water!"

IMGP4864
Mexican Poached Eggs
Serves 2

Ingredients
  • 1 14.5oz can black beans, drained and rinsed
  • 1 1/2-2 cups salsa (I used salsa verde)
  • 4 eggs
  • Queso fresco, crumbled

Directions
Combine beans and salsa in a large skillet over medium heat and simmer for 3-5 minutes. Break the eggs into the bubbling mixture, spacing them evenly in the pan. Cover and let simmer for about 5-6 minutes, or until whites are barely set (on my stove, this results in firm but slightly creamy yolks). Scoop beans, salsa, and 2 eggs into each bowl and top with queso fresco.


Like I said before, this is not a pretty dish in the slightest. There's really no good way to present it, and I find it's ultimately the most satisfying when everything is just glopped together in a bowl. I definitely recommend queso fresco as the cheese topping, as opposed to something melty like shredded monterey jack - both for flavor and texture.
Tuesday, May 25, 2010

Tuna Avocado Ceviche

Ugh. Summer in Massachusetts is very nearly here. Too hot to cook. Too hot to think. Too hot to eat foods warmer than the inside of the refrigerator.

If you've got some time to kill in between prep and eating, then making ceviche is a great way to go. The acid from the lime juice begins to cure the tuna, imbuing it with citrusy goodness. The prep work is minimal - chop, squeeze, splash, mix, and chill. Just before serving, the last ingredient gets diced and added, and voila! A light, refreshing summer meal for those afternoons where it's just too hot to do anything.


Tuna Avocado CevicheServes 1

Ingredients

  • 4-6oz of sushi grade tuna, cut into 1/2 inch cubes
  • 2 scallions, green parts only, sliced
  • 1/2 small jalapeno pepper, seeded and minced
  • 1/2 - 1 tsp minced garlic
  • good splash of soy sauce
  • 1 lime
  • 1/2 Hass avocado
Directions
Combine all ingredients except for avocado and lime in a non-reactive bowl (Pyrex would be good for this) and squeeze 1/2 of the lime over everything, reserving the other half. Mix well and refrigerate for 1-2 hours. Just before serving, dice the 1/2 avocado and mix into tuna mixture. Combine well and serve immediately, preferably over a bed of greens or spinach. Squeeze reserved 1/2 lime over everything, if desired.
Monday, March 29, 2010

Mediterranean Eggplant Sandwich

Lunchtime ennui. It's an affliction that strikes millions of Americans every afternoon. It's especially hard to avoid it as a Slacker Gourmet.

Leftovers? Maybe sometimes, but most of the time, it's just not that appealing the next day. Turkey sandwich? How... original. More often than not, I find myself contemplating the mediocre offerings of the office cafeteria and wondering why I'm spending $7 on another unsatisfying lunch.

How can you fight lunchtime ennui? By making an easy, café-worthy sandwich that's filling, satisfying, and oh-so-tasty.


Mediterranean Eggplant Sandwich

Ingredients
  • 1 focaccia roll
  • 2 large and 2 small frozen breaded eggplant cutlets
  • 3-4 sliced rounds of fresh mozzarella
  • jarred roasted or pickled red peppers
  • 1-2 Tbsp hummus
Directions
Place eggplant cutlets in a toaster oven heated to 425°F for 15 minutes, or until golden brown and cooked through. Slice focaccia roll open and spread hummus on the top half of the roll. Assemble the sandwich by arranging the eggplant slices on the bottom half of roll, adding the mozzarella rounds and red peppers, and topping off with the top half of the roll.


Okay, so a sandwich with breaded eggplant cutlets doesn't seem very Slacker Gourmet, but when they come pre-breaded and frozen from Trader Joe's... that's a whole different ball game. Most of the prep time (the heating time for the eggplant) can be done while you're getting ready for work. Roasted red peppers can be found in the Italian section of the supermarket - I used Pastene garlic red peppers. Tangy and delicious!
Wednesday, March 24, 2010

Chicken Avocado Salad

When temperatures hit 70 degrees on Saturday, my body went into full-on spring food mode. Of course, by the time Wednesday hit, the weather had reverted to 50 and windy. The mind is a powerful thing, though, and cool temperatures weren't going to stop me from my favorite warm-weather Slacker Gourmet meal! It's quick, healthy, and seriously delicious.


Chicken Avocado Salad
Adapted from Healthy & Delicious: Avocado Chicken Salad

Ingredients
  • 3/4 lb. cooked chicken, diced into 1/2 inch cubes
  • 1 large tomato, seeded and chopped
  • 1 Hass avocado, diced
  • 1/2 bunch scallions, chopped
  • 2 Tbsp (or to taste) fresh cilantro, chopped
  • 1 lime
  • Salt and pepper, to taste
Directions
Combine tomato, avocado, scallions, and cilantro in a medium-large bowl and stir gently (the avocado should barely coat the rest of the veggies, but not break down completely). Cut the lime in 2 and squeeze the larger half over the veggies. Squeeze the smaller half of the lime over the chicken, then mix the chicken into the veggie bowl. Taste and season with salt and pepper, if needed. Keep tasting... until you're full. :)


This may seem like a bit of chopping and prepping for a Slacker Gourmet meal, but here are some shortcuts:
  • Use pre-cooked chicken. I know I'm showing the Trader Joe's love again... but they sell frozen, pre-cooked chicken in 1lb bags. 3-4 minutes in the microwave on half power should be enough to fully defrost the chicken without heating it up too much. You can also find pre-cooked chicken in the fridge case in most supermarkets, near the bacon and kielbasas, or use chicken from a cooked rotisserie chicken.
  • Instead of slicing and dicing a large tomato, use cherry tomatoes. You can cut them in half, or even toss 'em in whole.
  • Got a mini food processor? Toss in the cilantro and scallions (make sure to cut off the bad ends first!) together, and give it a few quick pulses.