Winter, why won't you end? We had a brief reprieve with a sunny, 50 degree day this past Saturday, but now we're back to gusty winds, frosty air, and the promise of more snow. Oh well - spring veggies and grilling time will come soon enough. In the meantime, I have more hearty, cold-weather recipes to share.
A few months ago, I was browsing Instagram. Laura of Mangia Paleo had posted a picture of homemade pumpkin bolognese over spaghetti squash, and I started drooling. However, I looked up the recipe, and one of the ingredients was a jar of marinara sauce. Brilliant idea, adding tomatoes and seasoning all at once, but with a tomato-allergic husband, this recipe was a no-go. But, I just couldn't get the idea of a meaty pumpkin sauce out of my head.
I set out to find another pumpkin bolognese recipe that didn't rely on added tomatoes, and failed. Tomatoes have a unique characteristic that blends together so well with other ingredients, so I didn't want to just leave them out of a recipe without a substitute in place. Suddenly, it came to me - instead of ground beef, why not use sausage meat instead? Letting sausage simmer with other ingredients is a really easy way to infuse great flavor into a sauce.
Turns out I was onto something! There are many recipes for pumpkin sausage sauce out there. But most of them called for the addition of heavy cream at the end to add richness. I liked the idea of a creamy sauce, but since we try to limit our dairy intake, I discovered that full-fat coconut milk could play that part quite easily. The mild coconut flavor melded harmoniously with the subtle pumpkin sweetness.
The flavor profile of the finished sauce will heavily depend on the sausage you choose to use. I typically use sweet Italian sausage, but hot Italian sausage, chorizo, or even a good breakfast sausage would be a delicious change. If you can find bulk (uncased) sausage meat, that will make your life easier - otherwise, you'll have to pull the casings off the sausage. Be sure to use the best quality sausage you find! The recipe wouldn't work quite as well with pre-cooked sausage since you finish cooking the sausage (and infusing the seasoning) in the sauce.
Like many of my recent recipes, this sauce is easily adapted to many different ways of eating. Paleo? It's fabulous served over spaghetti squash (which adds its own sweetness and a welcome crunch). Gluten-free? Either spaghetti squash or gluten-free pasta (which, quite frankly, is more photogenic, so that's how I made it for the pictures). Vegetarian/vegan? Well... I hear that Soyrizo is pretty tasty (I've never tried it), so you could try that in place of the sausage. If you do, let me know how it comes out!
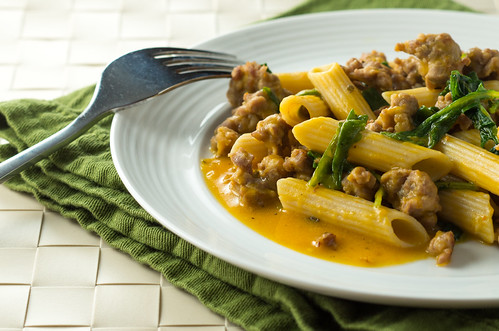
Pumpkin Sausage Sauce
Serves 4-6
Ingredients
- 1 15oz can pumpkin puree (no spices, just pumpkin!)
- 1 cup chicken broth OR vegetable broth
- 1 tsp dried sage
- a sprinkle of nutmeg
- a splash of olive oil
- 1 clove minced garlic (the pre-minced stuff is fine)
- 1 lb bulk sausage OR 1 lb sausage links, casings removed (any type - breakfast, Italian, chorizo, etc.)
- a couple of handfuls quick-wilting greens (baby spinach, baby arugula, baby kale, etc.)
- ½ cup full-fat unsweetened coconut milk OR ½ cup heavy cream
- salt and pepper to taste
- a 2-3 lb spaghetti squash OR 12oz dry pasta
Directions
Before starting to make the sauce:
If you're making spaghetti squash, get it prepped and start cooking it using your favorite method. If you're making pasta, start boiling water for the pasta.
Combine pumpkin puree, chicken broth, sage, nutmeg, a pinch of kosher salt, and a grind of black pepper in a decent-sized saucepan (it will eventually hold all of the ingredients). Bring to a simmer over medium heat, stirring occasionally to combine as it heats up.
While the pumpkin mixture is heating, in a nonstick skillet, heat a splash of olive oil and add some minced garlic. Cook for a couple of minutes, till garlic is fragrant but not too brown. Add sausage meat to skillet and break up with spatula, and cook just until no pink remains (but not really brown and crispy).
Using a slotted spoon, add the sausage and garlic to the saucepan with the pumpkin mixture. Bring back to a simmer and let it simmer for 10-15 minutes.
While the sauce is simmering:
If you're making spaghetti squash, scrape out your spaghetti squash strands and set aside. If you're making pasta, cook your pasta according to the package instructions. Drain and set aside.
Add the greens to the sauce, a handful at a time, stirring each handful in until it wilts. Let it simmer for another minute or 2.
Add coconut milk and stir to combine. Taste sauce and add any additional salt and pepper if needed.
Toss with spaghetti squash or pasta. Top with grated parmesan or romano cheese, if desired.
Print this recipe!