Friday, November 30, 2012

Foodie Pen Pals: November

This month, I started participating in a fun exchange program called Foodie Pen Pals (run by Lindsay over at The Lean Green Bean)! My friend Kristina told me about it awhile back, and I finally got around to signing up. Receiving fun foodie surprises in the mail once a month? How did it take me this long to get in on this???

I came home a couple of weeks ago to a package on the front steps from a lovely lady named Kelli! I brought it in and opened it up...

A mystery package! (Project 365: 244/365)

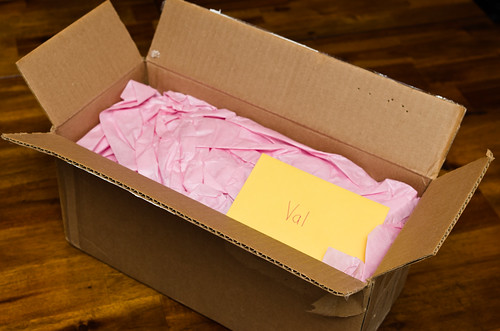
... looked under the hood... 

Fun treats

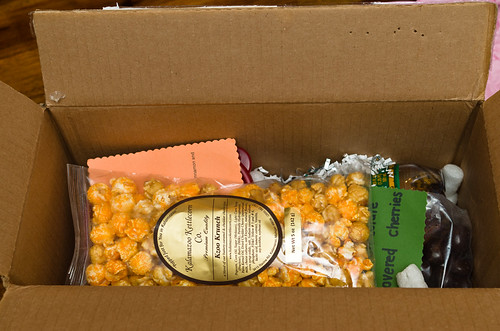
Oooh! Look at all the fun and tasty treats!!!

Contents of my Foodie Penpal package - November

Kelli follows a Paleo lifestyle, so she shared some of her favorite treats with me. I had also told her that I enjoy trying regional specialties, so she sent a few Michigan-specific treats along as well!
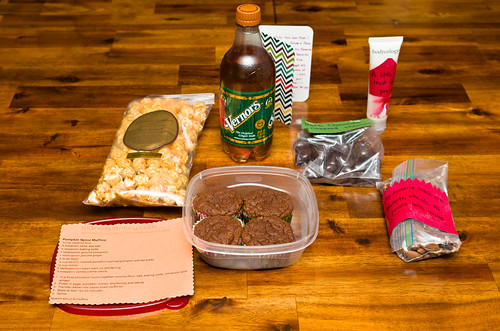
The complete list: 
  • Homemade Paleo pumpkin spice muffins
  • Snack mix: walnuts, almonds, pecans and raisins 
  • Dark chocolate covered cherries
  • Vernors ginger soda
  • Kzoo Crunch: buttery caramel and cheddar cheese popcorn
  • Bodycology cherry blossom lotion
The Vernors ginger soda was opened immediately after the package was unpacked - both my husband and I had mildly upset stomachs, so it seemed like the thing to do! It didn't taste anything like typical ginger ales. The bottle said "barrel-aged" and I believe it - it had that same kind of vanilla-y, smooth undertone that a good barrel-aged bourbon has. It was tasty - very glad we had the opportunity to try it! 

I've never had a completely Paleo sweet treat before, and the pumpkin spice muffins were pretty darn good! Quite impressive, given the ingredient limitations. 

The nut and rasin mix has been great for grabbing little handfuls as a pick-me-up whenever I need a little snack. I *heart* nuts!

The dark chocolate cherries were DANGEROUSLY good - I had to put them out of the way to pace myself, otherwise I would have consumed all of them the first day. 

I haven't opened up the popcorn yet, but I love sweet and salty combos, so I'm really looking forward to it!

The lotion arrived at just the right time - my skin has been so parched, with the dropping temperatures and increased winds. And it smells great too!

I would call my first month of Foodie Pen Pals a complete success - thank you Kelli! :) 


The Lean Green Bean
Curious about Foodie Pen Pals? In a nutshell, there are monthly sign ups (so you're not locked in if life gets in the way in any particular month). On the 5th of every month, you're assigned a FPP, and you have until the 15th of that month to contact them, get their mailing address and food preferences, fill up a package, and send it their way! The spending limit is $15 before shipping, and the package must include something hand-written (a card, a recipe, etc.). If you're a blogger - on the last day of the month, you'll post a "reveal" (which you can add to the reveal round up on The Lean Green Bean - here's this month's!).

Due to Hurricane Sandy, next month's FPP is a little different than usual. Instead of getting matched up with someone to send a package to, Lindsay is encouraging everyone who signs up for FPP in December to donate the money you would have spend on filling and mailing a box of goodies ($15 - $25) to New York Cares. Go to her Foodie Pen Pals for Charity page for more details, and to sign up for your virtual commitment to donate between December 3rd and 7th!

The normal Foodie Pen Pals exchange will resume for January, with sign ups beginning December 18th. If you're interested in learning more, visit the Foodie Pen Pals page for all of the details!
Thursday, November 15, 2012

Baking: Turning Quick Bread Mix into Chewy Cookies

Baking experiment

As the holidays approach, all sorts of festively flavored quick bread mixes have started gracing the supermarket shelves. Pumpkin, gingerbread spice, cranberry-walnut, chocolate peppermint... the list goes on and on. The problem is, I don't want a loaf of bread, I want fresh-out-of-the-oven cookies. 

As I've mentioned before, baking is not this Slacker Gourmet's forte. I love some homemade sweet treats as much as the next person, but I have very little patience for measuring out and sifting dry ingredients. Boxed cookie mixes don't come in the most exciting flavors, however, all of the yummy seasonal varieties of quick breads sound like they'd make excellent cookies. But how can we convert the quick bread mix into a successful cookie recipe? 

I took a look at homemade quick bread recipes, and made a mental note of the proportions of the major dry ingredients (flour, leavener(s), salt, sugar*) for one loaf. Then I looked up a few recipes for chewy cookies (since that was the texture I was hoping for), and checked out the proportions of dry ingredients for those. 

It turned out that the dry ingredient ratios were very similar between the 2 different types of recipes (quick breads seem to have a little bit less sugar, though). The amount of dry ingredients called for in a quick bread recipe yielding one loaf was the same amount called for in cookie recipes that yielded approximately 2 dozen good-sized cookies. The question was, could I add the dry ingredients from the quick bread mix to the same amount of wet ingredients from the cookie recipe (in this case, 2 eggs and 2 sticks of butter), and get cookie dough?

Cookies are typically made by the creaming method, in which you cream (mix) together butter and sugar until it's light and fluffy, then slowly incorporate the eggs. Once the eggs are in the mix, the dry ingredients get added slowly, just until the dough comes together. However, the quick bread mix already had sugar in it, but since quick breads are not quite as sweet, I added a couple of tablespoons of sugar to the butter to help it get even lighter and fluffier. Is it necessary? I'm not 100% sure, but it didn't hurt matters here. 

Once the dough came together, it seemed like it was indeed a cookie dough - maybe a little softer than I'd thought it would be. Chilling in the fridge for an hour or two could improve the texture. I was impatient, though, so I forged ahead and dished out 1 1/2 tablespoon portions with my handy-dandy cookie scoop onto my prepared cookie sheets, slightly doubtful that this would actually work.

20 minutes later, after baking and cooling, I ended up with...

Experimental cookies (Project 365: 241/365)

It worked beautifully! Chewy, chocolate-y and minty, these were some darn tasty cookies! 3 days later, we're still eating them, and they're still chewy and delicious.

Experimental cookies

Chewy Cookies (made from a quick bread mix)
Approximate yield: 2 dozen 2 3/4 inch cookies

Ingredients
  • One box of quick bread mix (meant to yield one loaf)
  • 2 eggs
  • 1 cup (2 sticks) butter, softened (cut up and microwaved on high for 20 seconds does the trick)
  • 2 tablespoons sugar
  • 1 cup nuts, chocolate chips, or other mix-ins (optional)

Directions
Preheat oven to 350°F. Line 2 cookie sheets with parchment paper.

Cream together butter and sugar in a stand mixer or with an electric hand mixer, until light and fluffy (about 2-3 minutes). Add eggs one at a time, beating well after each egg.

Slowly add the quick bread mix in batches, until the dough just comes together (scrape down the sides of the bowl as necessary). If using mix-ins, gently stir them in after the dough is fully mixed.

Drop dough by rounded tablespoonfuls (although really, the cookie scoop will make your life easier) on the prepared cookie sheets, leaving a couple of inches in between each cookie.  Bake for approximately 10-12 minutes (begin checking them around 8 minutes). Remove from oven and let cool on cookie sheets for 10 minutes, then move them to wire racks to cool completely... or move them to your mouth. 


I'd originally planned to experiment with 2 different types of quick bread mix. Sadly, the bag of pumpkin mix met an untimely end on the kitchen floor, so that experiment will have to wait until I return to Trader Joe's. I have a good feeling about further experimentation, though!

*Yes, I know sugar is typically considered a wet ingredient in baking, but since it is already incorporated in the quick bread mix, I needed to consider it as a dry ingredient for this experiment. Back to where I left off...
Saturday, November 10, 2012

Leftovers: Easy Nachos

Hurricane nachos

I have a big problem with eating leftovers. If something was really delicious the first time around, I'll eat it a second time. No matter how yummy it was (again), by the 3rd time, I'm usually sick of it. Most of the time I'll try to only make enough for 2 rounds, but not all recipes scale down so well. Therefore, I need to find creative ways to reuse leftovers to avoid wasting food!

The Pumpkin, Turkey, White Beans, and Greens Chili from a couple of weeks ago was one such recipe. I made it on a Thursday, and we ate it for dinner Thursday and Friday nights. Then, Hurricane Sandy arrived with a bang the following Monday, and I figured, "well, the rest of the chili will make a decent meal if we lose power, since we can heat it up on the gas stove." Can't be too picky about leftovers when there's a natural disaster in progress!

By dinnertime, though, we still hadn't lost power (we were lucky and never lost it), and my excitement about chili for the 3rd time was waning. What I really wanted was appetizers - mozzarella sticks, potato skins, nachos - that sort of thing. Hey, wait a minute... nachos?

I looked around the kitchen. We still had shredded cheese and Greek yogurt. We were running low on the Tostitos Scoops, but we had some leftover homemade habenero-lime tortilla chips that friends had brought over for dinner the night before. I found a can of sliced olives in a cabinet. And of course, the leftover chili was waiting to be heated up. Operation Nachos was on!


Hurricane nachos

Easy Nachos
Servings vary depending on whether snack or dinner servings

Ingredients
  • Tortilla chips
  • Shredded cheese
  • Sour cream or Greek yogurt
  • Chili 
  • Other toppings (sliced olives, chopped onions, scallions, salsa, jalapenos, etc.) 
Directions
Preheat oven to 350°F. Line a sheet pan with aluminum foil for easy cleanup. Spread the tortilla chips evenly across the pan and sprinkle liberally with shredded cheese. Bake for about 10 minutes or so, until the cheese is melted (the chips should smell toasty when they're ready to come out).

While nachos are baking, reheat your chili in the microwave or on the stove. When the chips come out of the oven, top with chili and your desired additional toppings. Dollop sour cream or Greek yogurt on top. Serve and enjoy!

Print this recipe!
Friday, October 26, 2012

Slow Cooker: Pumpkin, Turkey, White Beans, and Greens Chili

Pumpkin chili and pumpkin beer (Project 365: 224/365)

The hubby's tomato allergy has been somewhat of a challenge to accommodate. Many of our favorite easy meals were tomato-based (which is evident throughout the blog), and there's no easy substitute.

As the weather started getting cooler, my mind turned to chili. But - my standard slow cooker chili recipes call for cans of diced and pureed tomatoes... clearly it was time to think a little differently. White chilis are good, but I wanted something that had that hearty, stick-to-your-ribs feeling like a tomato-based chili. Chilis based on a purée of reconstituted dried chile (with an E!) peppers provided the richness I was looking for, but making the purée was an additional time-consuming step that I simply don't always have the time or inclination to do.

However, a couple of weeks ago, I had made a very successful pumpkin lasagna (which was maybe a bit more involved than a typical Slacker Gourmet recipe, but oh boy was it delicious). While eating the leftovers, I realized that I felt just like I was eating a red-sauce lasagna, but without a tomato in sight. The pumpkin added an earthy slight sweetness, but did NOT taste like a pumpkin pie. I wondered if the same principle would apply to chili. 

I searched around and found this recipe for a pumpkin, turkey and white bean chili. However, based on the comments, I tweaked the amount of meat and spices, and added baby kale (though any leafy greens would be a very welcome addition). The verdict? YUM... and even better the next day! It's not spicy, but it's quite flavorful, and easy to kick up with some hot sauce at the table. And (shhh!), it's actually quite healthy, but you don't really think about that when you're inhaling it.  

Pumpkin chili

Pumpkin, Turkey, White Beans and Greens Chili
Makes 6+ servings
Adapted from Crock Pot Turkey White Bean Pumpkin Chili

Ingredients
  • 1 1/2 pounds ground turkey
  • 1 small onion, diced
  • 3 cloves garlic, minced (I used the pre-minced fridge stuff)
  • 2 heaping teaspoons chili powder
  • 2 bay leaves
  • 2 heaping teaspoons cumin
  • 1 heaping teaspoon oregano
  • a couple hefty shakes of cinnamon
  • 2 15oz cans small white beans, drained and rinsed
  • 1 15oz can plain pumpkin purée (make sure the ingredients are only pumpkin, no spices!) OR 1 12oz package of frozen pureed winter squash (the kind that comes in a frozen brick)
  • 1 1/2 - 2 cups chicken broth
  • 1 4.5 oz can chopped green chiles 
  • 1/2 pound baby kale or other leafy greens, cut into bite sized pieces
  • olive oil for sautéing
  • salt to taste

Directions
Add all spices, beans, pumpkin purée, chicken broth (use only 1 1/2 cups of broth if using frozen squash - it's more liquid-y to begin with), chiles, and a good pinch of salt to the slow cooker and stir to mix together. 

Heat olive oil in a large skillet. Add ground turkey, onion and garlic to the skillet, along with a pinch of salt, and sauté until turkey is no longer pink and onions are soft, about 5-7 minutes. Add to slow cooker and stir until coated with the pumpkin mixture. Cook on high for 4 hours or low for 8 hours.

About 45 minutes before serving, boost the heat to high (if it isn't there already). Add the baby kale (or other greens) in handfuls, stirring after each addition. They should wilt pretty quickly. Cover and cook for another 20-30 minutes. If the mixture looks watery, uncover and cook for another 15 minutes. If using spinach, you'll probably only need 15-20 minutes of additional cooking to wilt and soften it, but the hardier greens will need the full 45 minutes. 

Taste and correct seasoning (you'll likely need a bit more salt), and serve!

Print this recipe!


When I made this, I cooked the ground turkey separately from the onions and garlic, but with a sufficiently large skillet, I see no reason to keep them separated. My hubby suggested that some sautéed mushrooms would be a welcome addition, and I agree.

As for accompaniments - we ate it with shredded Monterey Jack cheese, Fage 2% plain Greek yogurt, and Tostitos Multigrain Scoops. The plain Greek yogurt made a fabulous stand-in for sour cream (seriously, I think it's even better!).

Why Scoops instead of plain tortilla chips? Because they're delicious, and who really needs a spoon when you can do this:

Scooping up some pumpkin chili
Sunday, June 24, 2012

Chicken Avocado Salad, Revisited


So, once upon a time (read: for the past few summers), the hubby and I both had a love affair with Chicken Avocado Salad. I mean, seriously. It was basically deconstructed guacamole with chicken - what's not to love?

But then... disaster struck. More specifically, the hubby gradually realized that he had developed a tomato allergy. No more chicken avocado salad? Whatever would we do on those hot, sultry nights where we needed a legitimate cover for eating guacamole with a fork?

Summer hit with a vengeance in Massachusetts this week, and as usual, my thoughts turned to the beloved chicken avocado salad. Was it possible to swap the tomatoes out for something equally delicious, but in a completely different way? A quick Google search later, and I had cobbled together a recipe that, quite frankly, beat the pants off the original incarnation. And it took me, my cluttered kitchen and my pathetic knife skills only 30 minutes to put it all together. 


Chicken Avocado Salad: The Tomato-less Version
Makes 3-4 servings
Adapted from Avocado Chicken Salad and Chicken and Avocado Salad

Ingredients
  • 3/4 pound cooked chicken breast, cut into bite-sized pieces *
  • 1/2 pound frozen corn, thawed but not hot **
  • 1 14oz can black beans, drained and rinsed
  • 1 large avocado or 2 small avocados, diced
  • 3 scallions, white and green parts sliced
  • a handful (about 1/4 cup) of cilantro, chopped
  • 2 limes
  • 3 tablespoons olive oil
  • Salt and pepper to taste
Directions
Combine chicken, corn, beans, avocados, scallions and cilantro in a large bowl. Zest (using a microplane if possible - it's much less frustrating than a zester) and juice limes into a small bowl and add the olive oil. Whisk together (or use a fork, it's easier) until it looks like a dressing, and dump it into the big bowl with everything else. Mix it all together with a big spoon. Taste and add salt and pepper, if needed.

* I used Trader Joe's frozen grilled chicken.
** 3 minutes in the microwave on 50% power did it for me. I used Trader Joe's frozen Fire-Roasted corn - highly recommended!


Another beautiful thing about this salad - if you decide you want this taste of summer in, say, November, black beans and frozen corn never go out of season, unlike tomatoes. And sometimes, we all need a little summer in the middle of cold November rain.
Saturday, June 23, 2012

Food Processor/Stick Blender: Easy Olive Tapenade

Have you ever found yourself in one of these all-to-familiar situations?
  • Eating a piece of plain grilled chicken or fish and wishing you could jazz it up?
  • Making a sandwich and discovering that you're out of mayo and mustard?
  • Putting out crackers or sliced baguettes for company, but missing just one more spread for them?
Well, there are certainly many solutions for each situation. But what if I told you there was one recipe that could fix all of those problems, and more, in one fell swoop?

Enter olive tapenade. From Wikipedia:
Tapenade is a Provençal dish consisting of puréed or finely chopped olives, capers, anchovies and olive oil. Its name comes from the Provençal word for capers, tapenas.
Well, doesn't that sound fancy! However, your Slacker Gourmet alarm bells are probably going off. Finely chopped? Capers? ANCHOVIES? Breathe, people! Let's break this down:
  • You don't have to chop anything up into itty bitty pieces, as long as you have a food processor or stick blender. Traditionally some tapenades were made with a mortar and pestle - we're definitely not going down that road either. 
  • Yes, capers are one of those items you've typically bought for one recipe and one recipe only. They usually come in expensive little jars, of which you use 7/8ths for the aforementioned recipe. But - if you find yourself at Trader Joe's or an Italian grocery (not just a specialty shop), they sell capers in larger jars, and if you keep 'em in the fridge in their brine, they last for quite awhile. If you have them around on a regular basis, you'll find yourself using them in pasta/grain salads, stews, chicken sautés, or anything that needs a briny kick. However, if you still don't want to buy them, they are NOT essential to my quick tapenade recipe (which I suppose would technically make it an olive relish instead, but whatever). 
  • Anchovies? So not necessary. If you happen to have them around, sure, go ahead and throw a fillet in, but there's no reason to go out and buy them. 
What kind of olives should you use? Well, that's a matter of personal preference. I do recommend using a mix of a couple different kinds of olives if you're not using capers. Buy them pitted, since, well, this is the Slacker Gourmet. You don't necessarily have to get them from the fancy olive bar in nice supermarkets; there are many perfectly nice jarred olives out there. The only guideline I personally have is: if it comes in a can, it's really not appropriate for tapenade.

A little more explanation on the puréeing technique: typically a food processor is the easiest tool for the job. But - this recipe only makes a cup or so of tapenade, so if you have a 14-cup food processor and can't find your little mini processor, it's definitely not worth getting the big processor dirty if you have a stick blender.

Homemade olive tapenade (Project 365: 87/365) 

Easy Olive Tapenade
Makes 1 - 1 1/2 cups

Ingredients
  • 1 1/2 cups pitted olives, rinsed (this is important!) and divided (any kind, or a mix - see notes above) 
  • 2 tablespoons capers (optional - use a mix of olives if not using)
  • 1 whole clove garlic 
  • 1/2 - 1 tablespoon fresh parsley, basil, or oregano (optional)
  • 1/2 - 1 tablespoon lemon juice or red wine vinegar 
  • 2 tablespoons olive oil
  • Fresh cracked black pepper

Directions

Food Processor:
Combine 1 cup olives, capers (if using), garlic, herbs (if using), and 1/2 tablespoon lemon juice or red wine vinegar in the food processor bowl. Pulse until all components are between chunky and finely chopped. Drizzle olive oil in while processing until the mixture comes together and looks almost like a paste. Add the reserved 1/2 cup of olives and pulse until the new addition is coarsely chopped - this will add some extra texture. Taste and add the additional 1/2 tablespoon of lemon juice/vinegar if necessary, and stir in pepper to taste.

Stick Blender:
In the smoothie cup that comes with your stick blender, or a medium bowl, combine 1 cup olives, capers (if using), garlic, herbs (if using), and 1/2 tablespoon lemon juice or red wine vinegar. Hit it with the stick until the texture is between chunky and finely chopped. Add the olive oil all at once, and hit it with the stick again, until the mixture looks like a rough paste. Add the reserved 1/2 cup of olives and give it another hit with the stick until those olives are coarsely chopped and the tapenade looks like it has a variety of textures. Taste and add the additional 1/2 tablespoon of lemon juice/vinegar if necessary, and stir in pepper to taste.


Okay, now you have tapenade, and it should keep for at least a week in the fridge. Now, what can you do with it?
  • Use it as a relish for grilled chicken or fish. 
  • Slather it on raw chicken or fish, wrap in parchment paper or foil, and bake for 15 minutes (thin cuts of fish), 20-25 minutes (thicker cuts of fish), 30-40 minutes (chicken) at 350 degrees.
  • Use as a delicious sandwich spread (especially on a Mediterranean-inspired sandwich)
  • Spread it on baguette slices or crackers for an elegant appetizer. If you want to jazz up the spreading platform, brush baguette slices with garlic olive oil and toast in the oven or toaster oven until golden brown.
  • Toss it with cooked pasta and top with a sprinkle of Parmigiano-Reggiano for a quick meal or side dish.
  • My mother, a dyed-in-the-wool New Yorker, once suggested using tapenade as a non-dairy/non-fish spread alternative to cream cheese and lox - and let me tell you, it's darn tasty! You get that nice saltiness without the fishiness, which is a huge bonus for my smoked-salmon-hating hubby.
Easy, savory, and versatile - the perfect Slacker Gourmet condiment.
Monday, June 18, 2012

Slacker Gourmet Formula: Pasta/Grain Salad

Well, more than a year has passed since my last Slacker Gourmet post. Oops. I could make all sorts of excuses about buying a house, and job changes, and blah blah blah, but instead, I'll just refer you to the "Slacker" portion of the blog title, and just go from there.

As a UI Developer by trade, creating web page templates is a big part of my day-to-day life - a basic structure for a page, filled in with different content, depending on a particular database call. For a large site with hundreds of thousands of pages, templating is completely necessary, otherwise we'd be reinventing the wheel over and over again.

But what does that have to do with cooking? Well, as I postulated in my Fondue Theory post, the creation of a basic formula (or template) for a type of dish makes it easy (and nearly foolproof) to implement nearly infinite variations, limited only by your own imagination. Some basic knowledge of complementary flavors is certainly helpful, but I'll happily make some suggestions to get you started.

My Pasta/Grain Salad formula has been a couple of years in development. Its roots are in Lemony Couscous with Chickpeas, which I've made a shockingly large number of times. However, as a Slacker Gourmet, I crave variety - no matter how easy and tasty something is, I will get sick of it after eating it enough times.

Enter the formula. As long as everything stays in the same basic proportions, there is no reason that nearly every component can't be swapped out for something else in the same basic family (black beans instead of chickpeas - yes; M&Ms instead of olives - not so much). This is where that general idea of complementary flavors will come in handy.

And now... the magic formula!

Quinoa salad (Project 365: 86/365)

Pasta/Grain Salad
Serves 4-6 as a main dish, 8-10 as a side dish
Adapted from Lemony Couscous with Chickpeas

Ingredients
  • 1 1/2 cups uncooked pasta/grain
  • Enough water to cook the pasta/grain
  • 1/4 cup citrus juice or other acidic liquid (vinegar is untested; will probably need less)
  • 1 tablespoon citrus zest, if using citrus juice
  • 3 tablespoons high-quality oil (extra-virgin olive oil is probably best in most cases)
  • 1 14oz can of beans, drained and rinsed
  • 1/2 to 1 cup of something briny, like olives, capers, artichoke hearts, rinsed (the stronger the flavor, the less you need)
  • 1/8 to 1/4 cup of something crunchy, like nuts, seeds, wasabi peas, freeze-dried edamame (though the latter two will soften up the longer the salad sits)
  • 1/4 to 1/2 cup chopped herbs and/or scallions
  • Salt and pepper to taste

Directions
Cook pasta/grain according to package directions; let cool. Chop or slice the briny component if it needs it. Whisk together the oil, acidic liquid, and zest (if using). If using nuts, toast in a dry skillet over medium-high heat for 2-3 minutes, moving them constantly with a wooden spoon, until lightly browned and fragrant (as soon as you smell them, get them off the heat). Combine all ingredients in a large bowl. Taste and add salt and pepper, if necessary.


What's so amazing about this salad? Well, it's freakin' delicious. You can make a huge batch and eat it for a week (it keeps wonderfully in the fridge). Depending on the starch component you choose, you don't even need to heat up the kitchen to cook it (see this post for Slacker Gourmet-approved easy starch cooking).

And since it's that time of year, I'd be remiss if I didn't say how great it is for summer potlucks: there's no mayo or dairy to spoil in the heat, and it can easily accommodate special diets and allergies without sacrificing flavor. Gluten allergy? Use gluten-free pasta, rice or quinoa. Vegetarian/vegan? You're already all set as-is! Nut allergy? Leave 'em out - they're not a deal-breaker.

Variations
"Okay, okay, I'm sold!" you say. "But, I need some inspiration for the flavor combos... help me out here!"

Flavor combo Pasta/grain Acidic liquid Oil Beans Briny Crunch Herbs
Mediterranean * Quinoa** Lemons EVOO Chickpeas Kalamata olives Slivered almonds Parsley
Italian Orzo or farro Lemons EVOO Cannellini beans Black olives Pine nuts Basil
Mexican Rice Limes EVOO or canola Black beans Black olives Pumpkin seeds (pepitas) Cilantro and scallions
Moroccan Couscous Oranges EVOO Chickpeas Oil-cured black olives Pistachios Mint
* Pictured above.
** Yes, I know quinoa is technically a seed.


Want to mix it up more? Go ahead and throw some raisins in the Moroccan variation, some feta in the Mediterranean variation, or avocado in the Mexican variation (though it may not keep as long with avocado). Just keep those flavors complementary, and you can't go wrong!

Slacker Gourmet Basics: Easy Starch Cooking

Hate waiting for pasta water to boil? Don't have a rice cooker? Too hot to use the stove? Living in a dorm room? Never fear, there are still some easy and foolproof starches that you can make using just your microwave.

Rice: this isn't really a recipe, per se, but both Birds Eye and Trader Joe's make frozen, steam-in-the-bag rice. I think it comes out nearly as good as rice made by traditional methods, and way, way better than instant rice. Without a rice cooker, I'd choose the frozen rice over attempting to make it on the stove.

Couscous: all you need to do is boil water: 5 parts water to 3 parts couscous. Put couscous in a heatproof bowl with a good pinch of salt. Boil your water in the microwave, and pour over couscous. Cover and let sit for 10 minutes, then fluff couscous with a fork.

Quinoa: Rinse quinoa for a couple of minutes under running water (most quinoa comes pre-rinsed, but it can't hurt). Combine 1 part quinoa, 2 parts water and a good pinch of salt in a microwave-safe container. Cover loosely and microwave on high for 8 minutes. Let sit for 10-15 minutes (longer is better - more water will be absorbed), then stir gently and microwave it for another 2 minutes. Quinoa is done when the seeds are translucent, and the little white spiral-like germ is separating from the seeds. If there is still water left in the bowl, drain it.