Monday, May 5, 2014

No-Bread Romesco Sauce (Gluten-Free, Paleo)

Romesco sauce

Here in Massachusetts, it's finally spring with some consistency. Of course, we still have the occasional "surprise! It's 40 degrees and raining while you have to be outdoors in dressy clothes" day, but for the most part, the sun is shining and birds are chirping.

I don't know about you guys, but when the weather gets warmer, our dinners get pretty basic. The grill gets a lot more use and we start having more simple grilled meat and veggie dinners. Things like grilled chicken, however, are not terribly interesting on their own (even when it's made really well).

Enter this Romesco sauce. A smoky, garlicky concoction that originated in Spain, Romesco sauce is super easy to make if you have a food processor. My version eliminates the traditional slice of bread as a binder (blah blah gluten-free blah blah) and uses jarred roasted red peppers to cut down on the prep work, because... well, have you read the name of my blog?

Roasted garlic is still a key component, and it's not hard to do the traditional way. However, I have a few suggestions to cut down on the work.

One - go ahead and use your toaster oven. That way, you don't have to heat your whole kitchen on a hot day just for this.

Two - just bundle everything up in a piece of foil and stick it in the oven for minimal cleanup!

Three (this is the big one, and Italian grandmothers everywhere are probably cursing my name) - use pre-peeled garlic cloves! Around here, I can think of 3 stores that sell pre-peeled cloves: Trader Joe's, Wegmans (both TJ's and Wegmans come in bags with sealed pouches of 10 or so cloves) and Stop and Shop (they have a jar of peeled cloves in the produce section). If you roast the already-peeled cloves, you get to skip the annoying step of fishing out hot, squishy cloves from a whole roasted head of garlic.

Once the garlic is roasted, then everything takes a spin through the food processor, and voila! A big ol' batch of Romesco sauce. I guarantee you'll be able to carry it through at least 3 different (two-person) meals in one week.

Burger with cheddar and Romesco sauce

This is how we used one batch of Romesco sauce:
  • Topped plain grilled chicken breasts with it
  • Tossed it with penne, cut-up leftover grilled chicken, a bit of reserved pasta water, and goat cheese crumbles (we did this two different nights, in fact!)
  • As a burger condiment
How else could you use it?
  • As a topping for other plain, grilled meats and seafood; it would go really well with steak and fish
  • Spread it on toasted baguettes slices, top with goat cheese crumbles and broil them to brown the tops for an appetizer 
  • As a dip for pita chips
  • Tossed with roasted veggies or spaghetti squash
If you have a favorite use for Romesco sauce, let me know in the comments!

Chicken with Romesco sauce
Hey look, there are some Frozen Roasted Vegetables on the side!

No-Bread Romesco Sauce (Gluten-Free, Paleo)
Makes 2 cups

Ingredients
  • 1 small head (or 10 peeled cloves) of garlic 
  • 1 large jar (15-17 oz, depending on the brand) roasted peppers packed in water, drained
  • 1/2 cup almonds
  • 1/2 teaspoon smoked paprika
  • 1 tablespoon red wine vinegar or lemon juice
  • 1/4 cup olive oil
  • Salt to taste

Directions
Preheat oven or toaster oven to 450°F. Tear out a square of aluminum foil. 

If roasting a whole head of garlic, slice the top 1/4"-1/2" off with a sharp knife. Drizzle with olive oil and sprinkle with salt. Place in the middle of the foil piece and bundle it up. Put it in the oven and roast for 20-30 minutes, or until the cloves are easily pierced with a fork. Let it cool down, then remove the cloves.

If roasting already-peeled cloves of garlic (this is how I roll, because it's much easier), place the cloves in the middle of the foil piece, drizzle with olive oil, and sprinkle with salt. Bundle it all up and shake it up a bit to coat all of the cloves with oil. Roast them in the oven for 20-25 minutes, or until the cloves are soft.

Place the garlic, drained roasted peppers, almonds, smoked paprika, and red wine vinegar (or lemon juice) in the bowl of your food processor. Process it for a minute or two, until everything is pureed. You may need to stop the processor and scrape down the sides once.

With the processor still running, slowly drizzle in the olive oil. Most (if not all) food processors have a small hole in the feed tube plunger that's meant for this - you can just dump all of the olive oil in there, and let gravity do the work of slowly drizzling it in through the hole. Once all of the oil is incorporated, stop the processor, taste the sauce, and mix in salt to taste (I usually add a couple of pinches).

Print this recipe! 
Tuesday, April 29, 2014

80% Pizza

And now for something that's the complete opposite of dairy- and gluten-free... here's a guest post from my husband, Kevin! For as long as I've known him, he's been striving to make amazing pizzas at home. Luckily, it's surprisingly easy to make a darned good pizza at home without any pizza-specific equipment, and with just a few easily-obtained ingredients. Following this method, even I was able to make a pizza that was far and away better than the vast majority of our local take-out joints  - so if I can do it, you can too. 

Take it away, Kev!

Pizza!

Great pizza is great, and bad pizza is, well...it's still pretty darn good! Sounds like a good candidate to make at home, doesn't it?

Hi there. I'm Kevin. I like to think that Val's the gourmet, and I'm the slacker. So why am I here? Well -- I'm no chef, but when it comes to pizza, I've got some strong opinions.

Here's one - making pizza at home is: cheap, tasty, easy. Choose three. No, really. You don't have to compromise.

Cutting the pizza

Well, I should qualify that. Do you care about making 18" pies so you can get NY-size slices? Do you require your pizza to be wood-fired in a 1000 degree oven? Have you invested in a Hobart floor-standing mixer because your KitchenAid couldn't develop gluten effectively enough in big dough batches? No? Then don't worry about it. You are going to love the 80% pie.

This is the product of another opinion of mine - that in the food world, pizza is the purest embodiment of unattainable perfection. No matter how hard you work at it, it's always, always possible to make a better pizza. (Sure, plenty about pizza is subjective, but stick with me here ok?) So think about a pizza that is 99% as good as can possibly be made. We're talking the stuff of legend. The stuff you have to drive across state lines to find...or maybe even hop on a plane. This is the stuff you get from pizzaioli who have devoted their lives to it. That's the level of commitment required. That's a 99% pie.

An 80% pie, on the other hand, requires you to read a blog post written by a dork, buy three ingredients, and spend 30 minutes in the kitchen. You'll get it on the first try.

In the oven

Don't believe me? I've formed these opinions based on over a decade of trial and error (and error and error). And then I threw out most of what I came up with because I read stuff by folks like Kenji over at Serious Eats. It blew my mind.

The methodology in this post is adapted from one of Kenji's methods. Really, he did all the hard work. All I'm going to do is recommend where to cut corners. The beauty of this method is that it yields great, consistent results -- and it does it without special equipment.

Hardware

You just need a broiler and a 12" oven-safe skillet. Cast iron, enameled cast iron, or steel are all great. Just don't use non-stick whatever you do, it can't take the heat!

A bench scraper and pizza cutter are also handy, though not required.

Ingredients

Ingredients


Pizza is a blank slate. Topping combinations are limitless. That's a worthwhile rabbit hole to go down, but it's one for another day. First, we need to cover fundamentals. Let's make the slate tasty!
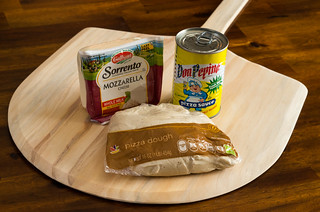
  • 1 can Don Pepino pizza sauce
  • 1 lb Sorrento whole milk dry mozzarella block
  • 1 lb Stop and Shop pizza dough (typically found near the deli, don't get the one from the bakery)
Note: this will yield two 10" pizzas, with leftover sauce and cheese.

That's it. Only other thing you need is a little flour and some olive oil.

Do the ingredients matter? Yes. I chose these specific brands because I've gotten the best results from them out of all widely-available options I've tried. Jump down to the appendix if you want explanations and alternatives.


Dough Prep

Take your dough out of the fridge and let it warm up to around room temp on the counter. You might need to do this 15 to 30 minutes before starting. Don't skip this step -- it's important because it makes the dough easier to shape and helps to get a good rise out of it. Once it warms up, let's jump in.

I don't know about you, but dough intimidates me. The darn stuff just seems to have a mind of its own. Well, let's show it who's boss. First things first: we're making 10" pizzas, and a pound of dough is perfect for two of 'em, so we'll subdivide it. After that it will have some time to rest and proof (warm up and rise even more) while we prep other ingredients.

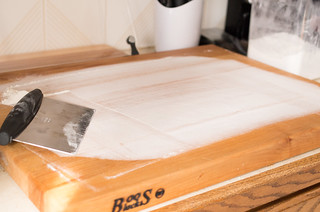
Grab some AP or bread flour and prep a work surface. A bench scraper is great for this.

Floured board

Pretty much all packaged dough is sticky stuff. Put some flour on your hands and turn the plastic packaging inside-out. Let gravity help you peel the dough off the plastic, and onto your floured surface.

Dough

Get a little flour on every sticky surface of the dough. This makes it easier to work with.

Working the dough

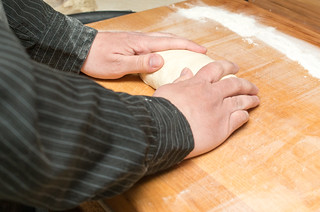
Shape it into a little loaf. Don't knead it (fold it over itself), just press and form it.

Dough log

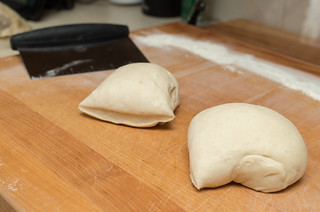
Now it's easy to divide it into two equal pieces. Again, a bench scraper is great for this, or use a knife. It doesn't have to be perfect. Eyeball it!

Note: If you didn't divide it as evenly as you'd like, just go with it. Don't try to rip little pieces off one and stick it to the other one. The dough is typically too far developed to do that successfully, and hilarity will ensue if you attempt it.

Split dough

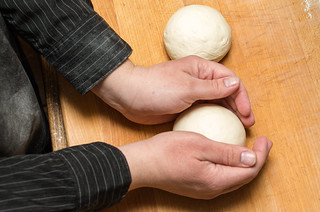
Take a dough in your hand with the cut side down. Shape it into a ball by pushing it into itself from the bottom-up, like it's a little jellyfish. Repeat with the second one.

Dough ball

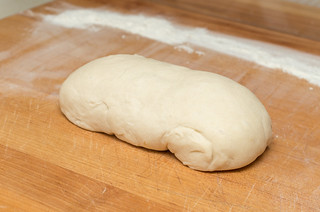
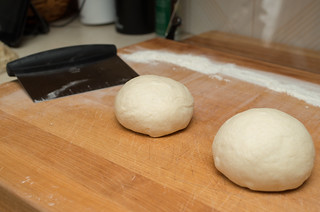
Put the dough on your work surface, seam side down. Keep it touching the surface and rotate it a few turns between your hands. This makes the dough taut and smooth.

Dough ball

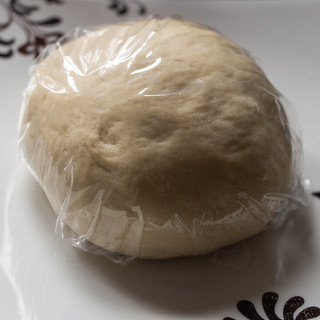
Good to go! Cover these in a little plastic wrap and let them sit and proof.

Proofing the dough


Note 1: Hey if this was confusing, refer to someone far more skilled than I at teaching -- the great Mr. Alton Brown. He has an excellent video demo of dough handling in his first pizza episode of Good Eats: Flat is Beautiful.

Note 2: If you want to save one of these for later, seal it up in a zip-top plastic bag (quart or larger), with as much plastic touching the dough as possible. This prevents it from forming a skin.
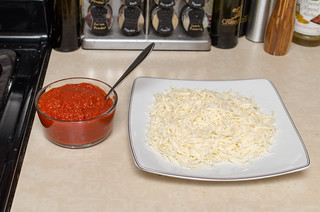
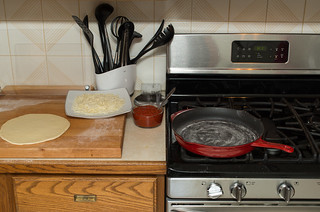
Mise En Place

Sauce and cheese

Pop open your sauce can and get a large spoon at the ready, then shred some cheese. Each 10" pizza only needs a few ounces, so you don't have to shred that whole huge block. Unless you wanna.

Remember, you are the Royal Taster. Always be sure to taste your cheese to ensure it's safe for general consumption. Might want to repeat that a few times to be especially safe.

Pre-heat

Ready to go? We're going to use the broiler.

Arrange your rack so you can just barely fit your skillet on there under the broiler. I haven't tried this with a bottom-drawer broiler, but I expect that it would work fine. Turn the broiler on as high as it goes and let it pre-heat.

Form the Dough

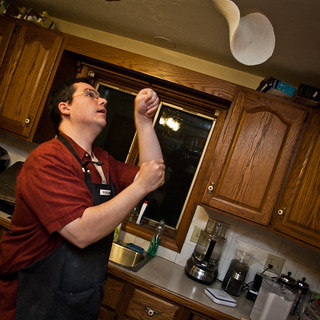
Now for the fun part! Let's shape that dough ball into a disc. Are you ready to toss that sucker in the air?

Make-a-da-pizza (Project 365: 80/365)

Just kidding. Yup, it's really fun to toss it like this, but frankly it doesn't work great with the small 10" pizzas we're making today, and it's a bit error-prone. Also, don't do this in a kitchen with a ceiling fan going.

Nope, this article is about consistent and easy results. Know how we get that? A rolling pin.

Pizza nuts typically scoff at the thought, and yup, it's true that you won't reach perfection this way -- but you will get an awesome pie, and you'll do it on your first try. Hand-stretching takes hours of practice. After years of doing it I still tear the center of my dough sometimes.


Maybe I just suck. But no matter! With a rolling pin, it's smooth sailing.

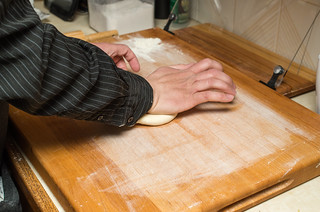
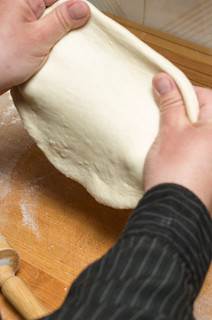
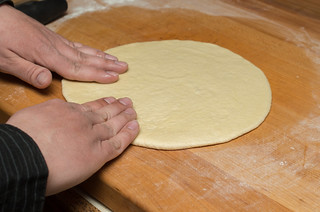
First, lightly re-flour your surface and drop a dough ball on it. Use the palm of your hand to flatten the ball into a disc.

Forming the dough

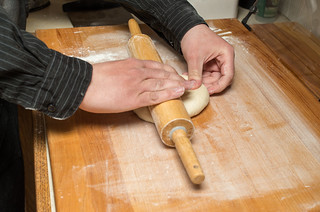
Now start rolling. It'll take a bit of time and patience. Don't rush, you'll get the hang of it.

Forming the dough

Stretch it gently with your hands a bit as you go, then roll some more.

Stretching the dough

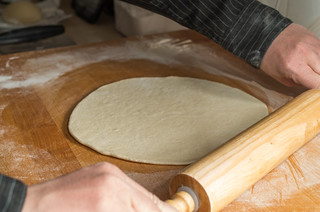
As you progress, put it in the 12" skillet as a point of reference. We're aiming for a 10" dough -- actually, just a little bigger.

Sizing the dough

If it takes an eternity your dough might just need to warm up a bit more. You can always cover it in plastic and come back after 5 or 10 minutes and try some more. Temperature makes a huge difference in how much your dough cooperates.

Rolling the dough

This method won't give you much of a crust, but it will give you the uniform thickness you need.

Sizing the dough

There we go. That's the size you want, a little smaller than the skillet. Return your dough to the work surface.


Top and Cook

Here we go, the point of no return.

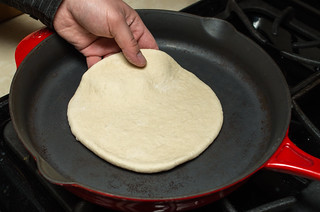
You're going to pre-heat the skillet on the stove top, put the dough in it, top it, then put it in the oven.

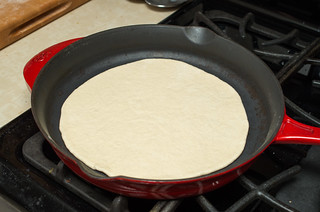
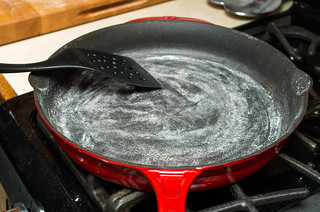
First, dust the skillet with some flour, and shake off excess. Spread it evenly.

Flouring the pan

Preheat the skillet under high heat. Our aim is to get it to the point just before it starts smoking.

Meanwhile, on your work surface, drizzle some quality olive oil on your dough and rub to coat. Blot off any excess. Note that this will shrink your dough slightly. That's OK.

Oiling the dough

Look sharp, keep an eye on that pan as it heats. It should take around three minutes. Now's the time to have your sauce and cheese at the ready.

Ready to go

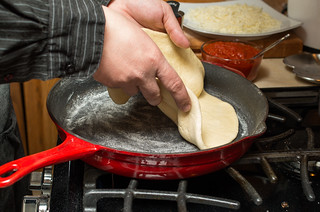
Once you smell the flour start to get fragrant, before it starts smoking. it's time to add the dough to the pan. Safety is more important than perfection here, don't burn yourself! I like to lay one edge of the dough near the edge of the pan, then lay the rest down.

Placing the dough

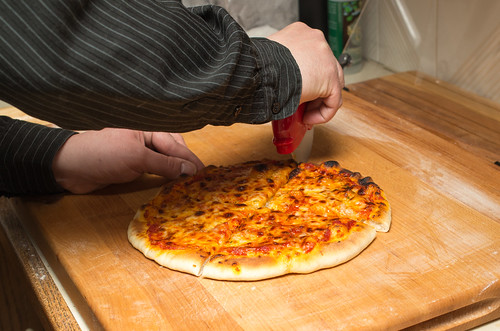
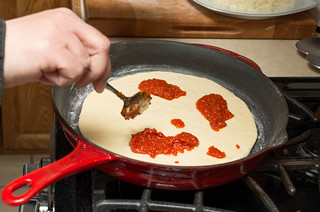
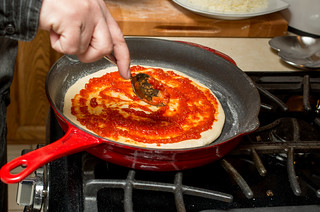
If your dough ended-up bunched or something in the pan, use a spatula to adjust it. Don't worry if it's a bit oblong -- we need to keep moving now. Spoon on some sauce.

Saucing

Spread the sauce with your spoon and get good coverage, but don't drown the thing.
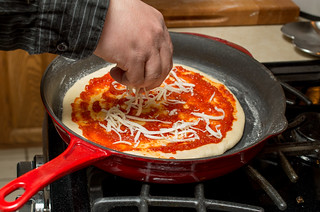
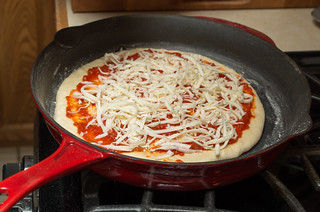
Saucing

Cheese it!

Adding cheese

You may be tempted to bury it in a sea of white. Resist this urge. The best pizza has balance.

Ready to bake

Feel free to sprinkle with a bit of kosher salt if you want to kick things up a bit. Also some dried oregano or parsley is nice to add some color.

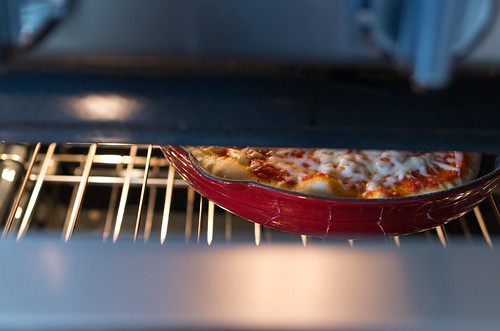
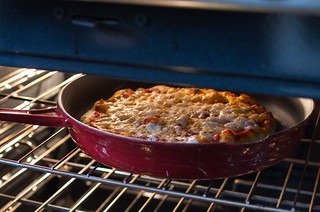
Turn your stove-top burner off, then under the broiler it goes!

In the oven

Now to get this baby golden and delicious. Look for your cheese and dough to brown up. It'll take anywhere from 1.5 to 4 minutes, depending on your broiler. You may need to rotate your pan halfway through to get even browning. Watch it, then pull it when it looks maximally awesome.

Almost done

The top is done, but the bottom isn't yet. Put it back on a burner and turn it up to high.

Crust check

Almost.

Crust check

Almost!

Browned crust!

There we are.

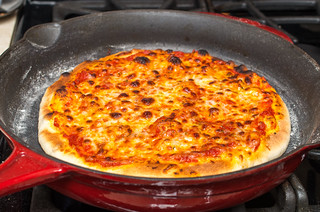
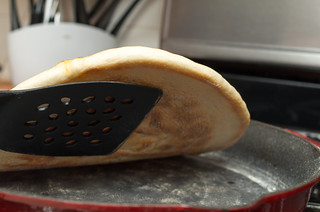
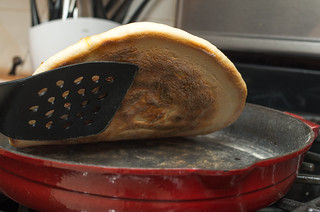
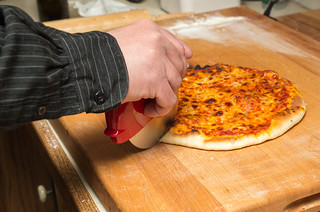
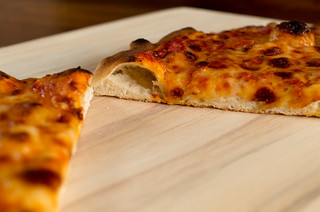
Well done! Kill the heat, and use a spatula to carefully transfer the pizza to a cutting board. Let it sit for a minute, then if you have a pizza cutter go to town. Else any cutting implement can be used. My grandma was all about kitchen shears.


Cutting the pizza

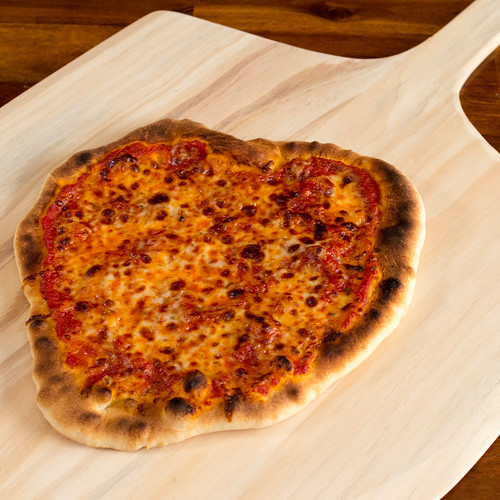
Here, my first attempt had crust that was a bit dense. That's because I didn't let the dough warm up and proof long enough. No matter, it was still delicious!

Cornicione

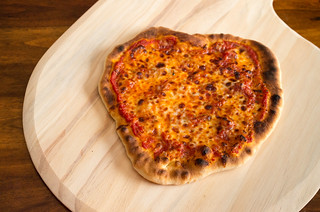
Making a second one? Dive right back in. Here, Val did our second attempt. The dough was much warmer, which made it tougher to keep round. It also yielded a better crust, though! (The blobby heart shape was... totally intentional. *shifty eyes* - Val)

Blobby pizza

Nom!

Dig in!!

I <3 pizza (Project 365: 60/365)


APPENDIX

When it comes to slacker pizza making like this, I found the hardest part to be picking which ingredients to source. Here's what works best for me, and some alternatives for convenience.


Sauce

This is a matter of personal opinion, but I strongly recommend you pick up:
  • Don Pepino pizza sauce
    • Fresh, uncooked, delicious sauce, light on herbs.
    • Lots of super markets have it -- I've seen it in at Hannaford's, Price Chopper, and Wegmans. My Stop and Shop doesn't have it unfortunately, but yours may. I can't remember if Whole Foods has it.
There's a really big difference between starting with an uncooked vs. cooked pizza sauce. It's certainly a matter of opinion, but I've found that I strongly prefer uncooked.

There are a million brands you could use...why Don Pepino? First, because it doesn't have calcium chloride. Most brands add this to keep tomatoes from becoming mushy, and in my experience it affects flavor big time. Lots of forums discuss this issue. Second, because the quality is excellent. It tastes like fresh garden tomato, year-round. I have no idea how they do it.

Alternative cooked sauce:
  • Stop and Shop Nature's Promise Organic pizza sauce
    • Surprisingly tasty, heavy on herbs.
    • Better than all of the other pre-made cooked stuff in my book (but not as good as Don Pepino).
I feel like cooked sauce doesn't have enough bright, acidic bite to properly stand up to fatty cheese.


Cheese

I'm lazy, but there's one bit of manual labor I don't skip for pizzas: shred your own cheese! Why? Because pre-shredded has anti-clumping agents added. That means it doesn't melt and gooify as effectively.

We'll talk dry mozzarella today. Go full fat whole milk. If you want less calories, use less cheese.
  • Polly-O
    • Having visions of 7th-grade lunch? We're not talking string cheese here. Polly-O whole milk dry mozz blocks are actually world-class stuff. A lot of big name pizzerias swear by it.
    • A little hard to find. I can only get it at Price Chopper at the moment.
  • Sorrento
    • Ubiquitous and excellent stuff.
  • Trader Joe's
    • Also excellent. A little on the saltier side.
If you must use pre-shredded, that's OK. I won't tell.


Dough

The tastiest dough is one you make yourself, but most good ones require an overnight cold ferment. And all of 'em require you to make a mess in your kitchen. This goes against the spirit of this particular pizza post.

Instead, let's buy one. Pick a dough that's cold but completely thawed. We don't want to wait so avoid frozen, and also avoid dough that's so puffed-up it looks like it's about to burst out of the bag.

Options that tend to be consistently good:
  • Whole Foods
    • This is my favorite store-bought dough. It has a great flavor and is easy to work.
    • So why didn't I make it my default recommendation? Because the Stop and Shop stuff is much more ubiquitous.
  • Stop and Shop
    • S&S makes a decent dough. Not the best color and rise, but good flavor.
    • If your Stop and Shop is anything like mine they actually sell three or four different doughs. I use the Stop and Shop branded one that is not from the bakery. The bakery stuff is made on-site, and it's inconsistent. The non-bakery one (usually found near the deli) is made off-site and is completely consistent, no matter which store you buy it at.
    • Heads-up: they store this stuff in freezers in the back, and sometimes all you can find for sale is rock-hard. Avoid those (unless you need a spare sportsball).
  • Bertucci's
    • Just walk up to the take-out counter and ask to buy some dough. You might feel a little weird doing it, but they were always happy to sell me some. They sell large (about 1.3 lb I believe) and small (maybe 3/4 lb?).
    • It ain't cheap, but sometimes they offer you delicious free rolls to go with it! :)
You can certainly ignore these suggestions and try any other dough you like, but be warned -- dough sampling can be frustrating. I often ran into options that weren't tasty, weren't fully-developed (so they would tear), or otherwise caused problems.

If you're new to pizza, try to start with one of these options. Then go nuts and branch out to other stuff!
Monday, April 14, 2014

Macaroons? Cookie Dough Bites? (Gluten-Free, Vegan)

Macaroons? Cookie dough bites? (Project 365: 103/365)

Have you ever gotten halfway through a recipe you found somewhere, and realized there was no way that it was going to work as written? With cooking, it's definitely easier to recover from and make tweaks, but when it's a baked good... well, all bets are off.

This happened to me about a month ago. I had come across a recipe for cashew flour chocolate chip cookies, and even though I had some warning bells going off in my head as I read the recipe, the positive comments convinced me to give it a shot.

Mix together dry ingredients - okay. Add butter - hrmm, no indication of the temperature or state of the butter given. Guess I'll soften it, that's pretty typical for cookies, right? Okay, now I have lumpy flour. Maybe when I add the liquid... liquid... there's no more liquid in this recipe. I guess the butter was supposed to be melted. Uh oh. Now what do I do???

Well, I'm not one to give up, especially when I've psyched myself up for chocolate chip cookies. I added some liquid, more flour, sugar (the original recipe also had no sweetener)... just guessing at amounts, until I had something that resembled a cookie dough. Whew! Let's get these guys onto a cookie sheet and bake 'em up.

7 minutes in - gee, these look awfully puffy and they're not spreading. I think I'll squish 'em down with a spoon and give them another few minutes.

12 minutes - well, these look like they're about as done as they're going to be. Yikes.

Failcookies (Project 365: 59/365)

Hey, even though they look like they fell off the ugly tree and hit every branch on the way down... they tasted good! I fed them to my husband, who thought they had a similar texture to macaroons. Macaroons. I can get behind that.

The next time I made them, I decided to use coconut oil instead of softened Earth Balance to enhance the macaroon-iness of them. Coconut flavor without the chewy coconut bits, for those who don't care for that texture. I also rolled the dough into balls for baking and did NOT flatten them with a spoon this time.

Hooray! They looked more like macaroons this time. But - to further confuse matters, my husband said that he felt like he was eating cookie dough, but in a good way. Cookie dough bites? I can also get behind that.

This is my long-winded way of saying, this is a gluten-free, vegan treat that is having a slight identity crisis. Make the dough balls a little bigger (1.5" diameter) if you want to call them macaroons. Make 'em a little smaller (1" diameter or even a little smaller) if you want to call them cookie dough bites. Don't like coconut? Use softened butter or margarine instead of coconut oil. Mix in whatever other chocolate or nuts or dried fruit you want.

Just don't flatten them with a spoon.

Macaroons? Cookie dough bites?

Macaroons or Cookie Dough Bites
Makes approximately 20 2" macaroons, more if you make them smaller

Ingredients
  • 1 cup gluten-free AP flour OR regular AP flour
  • 1 cup nut meal (I used cashew meal - almond meal should also work!)
  • 1/4 cup sugar
  • 1 tsp baking powder
  • pinch of salt
  • 1/3 cup coconut oil, room temperature OR 2/3 stick butter, softened
  • 1 tsp vanilla
  • 1/2 cup non-dairy milk OR dairy milk
  • 1 cup mix-ins (I used 1/2 cup chopped pecans and 1/2 cup mini chocolate chips)

Directions
Preheat oven to 350°F. Line a couple of cookie sheets with parchment paper.

Mix together flour, nut meal, sugar, baking powder and salt in the bowl of your stand mixer until combined. Add coconut oil or butter and beat on medium speed until the dry ingredients look like they have small lumps evenly distributed throughout. 

Mix vanilla and milk together. While running the mixer on a low speed, slowly pour milk mixture into the bowl - the dough should come together. Add mix-ins and mix until just combined.

Roll dough into balls (1" balls for 2-bite treats, 1.5" balls for 3-bite treats) and place a couple of inches apart on the prepared cookie sheets. Bake for 9-10 minutes for smaller treats, or 10-11 minutes for larger treats. If they don't feel tacky to the touch on top and they're slightly firm, they're done - they won't brown much. Remove from oven and let cool on the cookie sheets for 5 minutes, then move them to a cooling rack.

Print this recipe!
Sunday, April 13, 2014

And now for something completely different... the Liebster Award!


Today, I'm taking a break from my (completely not) regularly scheduled food blogging. This is a little glimpse into the non-Slacker Gourmet aspects of my life!

On Thursday, Kristina over at The Fast and Foodiest (if you're a person who likes food, fitness, and/or cute puppy pictures, you should head over there now!) nominated me for a Liebster Award! What is this, you ask? I hadn't heard of it before, and there seem to be lots of variants floating around the blogosphere, so I'll just go with some of the most common themes.

Liebster is a German word that loosely translates to "dearest". The Liebster Award is passed from blogger to blogger, recognizing up-and-coming bloggers with relatively few followers. The nominator asks the nominee some questions, and the nominee answers those questions on their blog, links back to the original nominator, nominates and links to their own favorite up-and-coming bloggers, and asks them a new set of questions.

I hesitate to say it's like a chain letter (but it kinda is), but for those of us with very few followers, it's nice to have a little extra link love thrown our way (I'm currently up to a whopping 19 "likes" on Facebook, including myself - this is not the big leagues here). Plus, it's a lovely distraction when I don't have any recipes ready to post, so away we go!

Kristina's questions for me:

1. Where do you draw inspiration from?
My inspiration comes from the people and circumstances around me, whether in real life or virtually. All of my friends have wonderful qualities that I try to emulate. When I was younger, I kinda saw myself as a composite of all my friends, and I thought that was a bad thing. Now - I realize it just means that they're the meaning in my life, they're my inspiration... (oops, lapsed into a little Chicago there for a second).

2. Your favorite vacation spot?
Oh boy, this is tough. There are a few, and for all different reasons!

Key West, mostly because of kitties.

Welcoming committee (Project 365: 45/365)

Montreal, because I've been there at a few different stages of my life (high school with schoolmates, college with a group of friends, as adults with just Kevin and me and with another couple), and I discover new things each time I'm there.

Notre-Dame and carriage

Outerbanks, because renting a house with your chosen family (twice) is awesome! This is our second trip, with a smaller group (2013):

Beach fire

3. Food you will never, ever try?
Fugu. I love most sushi, but I'm not anxious to try sushi that has a much greater chance of killing me.

4. Food that you haven’t tried, but are totally desperate to try?
I had a really hard time with this, because I've tried a lot of things. But, I want to try a turducken and a cherpumple, just to say that I have. 

5. Most memorable “foodie” moment/ most memorable meal?
I've had a lot of awesome foodie experiences - tasting menus, 10-course meals cooked by good friends (Kristina and her husband Mike are insane in the best way possible)... but the one that sticks in my mind the most is the very first chef's tasting menu that I had, at Morimoto in Philly. 

My then-boyfriend (now ex, but still close friend) and I went for lunch to celebrate getting his first career job (which incidentally, he's still at 9 years later). I have such fond memories of the rock shrimp tempura and the first time I had squid nigiri that didn't make me feel like I was chewing on a piece of rubber. I went to the NYC Morimoto for the tasting menu a couple of years ago and it was wonderful, but nothing's quite like your first time. :)

6. Have you climbed/hiked a mountain? Where?
I haven't! But hiking Mount Wachusett and having a picnic is a goal for this summer (but I say that every year).

7. What accomplishment are you most proud of?
In general, making it to adulthood with my dignity (mostly) intact.

Semi-recently - I won 2nd place in my company's annual photo calendar contest ($200 cash prize and my photo is the photo for June). This isn't the most impressive thing in the world, I know. But - there are hundreds of entries every year (our company has a global presence, and there are usually between 300-400 entries). A committee culls those down to 40 entries and opens up voting across the company. I've entered in previous years, and never made it to the voting stage, so to win 2nd place was a big deal! Those who know me know that amateur photography is a huge hobby for me, and this was external validation that, hey, I'm actually not too bad at taking pictures.

The prize-winning photo:

Milky Way over the ocean

8. A goal of yours that makes you shake in your boots, just a little?
Adding tiny humans to our family. Still not there yet, not entirely sure when/if it'll happen.

9. Place you would move to if given the ideal opportunity?
I love Massachusetts, and I wouldn't want to move away from it full-time. So, probably a bigger/nicer house not too far from where I currently live! Although I wouldn't say no to a winter home in Arizona...

10. Celebrity that makes you cringe?
Too many of them... but I'll go with Lindsay Lohan - she really was talented, until she took a detour into hard living. Drugs are bad, mmkay?


And now... my nominations! I don't follow too many blogs (no time to keep up with them), so the smaller blogs I follow belong to people I know in real life (and overlap with Kristina's nominations). I won't be insulted if those who have already done this don't want to do it again!

Your questions (I'll keep it simple with just 5):
  1. What did you think you would be doing with your life when you were 13 years old, and if your 13 year old self could see you now, would she be surprised?
  2. Is there anything you're really good at making that you don't like to or won't eat? If so, what?
  3. What is your favorite everyday meal (easily accessible, don't have to travel far to get it)?
  4. Have you had any celebrity encounters? If so, what was the most interesting one?
  5. What was your worst culinary disaster?
Saturday, April 5, 2014

Slow-Cooker Chicken Burrito Bowl (gluten-free, dairy-free)

Life has gotten in the way of this Slacker Gourmet these past few weeks. Our oldest cat, Oliver, was diagnosed with lymphoma in March (following over a month of mysterious symptoms and red herrings leading to incorrect diagnoses), and the 3 weeks that followed were filled with vet visits, tube feeding, and absolutely no cooking at home. Unfortunately, chemotherapy was unsuccessful and he had become too weak to fight any longer, so we had to make the devastating decision to put him to sleep on March 30. The house feels so much emptier without his room-filling purrs. :(

But - life goes on, and our other two kitties, Amber and Orville have been getting awfully spoiled this past week. The emotional toll of the past couple of months plus the constant stream the takeout and restaurant food of the past few weeks haven't done good things to our bodies. It was time to ease back into home cooking, and what better way than with a home adaptation of a takeout favorite?

Burrito bowl

One of my favorite fast-food(ish) compromises is a burrito bowl from Chipotle. 85% of the deliciousness of a burrito, with about 50% of the guilt. It's easy to recreate most of the yummyness of the bowl at home with a few simple ingredients (and some Slacker Gourmet shortcuts)! Jarred salsa (I use Goya Salsa Verde, due to the hubby's tomato sensitivity), frozen rice and corn (Trader Joe's frozen roasted corn is amazing, if you can get your hands on it!), prepared guacamole, and boneless chicken thighs make this come together so quickly - 5-10 minutes of prep in the morning, and another 10 minutes at night.

This is not a beautiful dish. If I had used sour cream and shredded cheese and sliced avocado, it could have been prettier... but that's at odds with the dairy-free (and always-lazy) Slacker Gourmet household these days. Of course, you can use whatever toppings you'd like!

The recipe as written makes A LOT of the chicken and bean mixture - but it freezes really well for future use! You can always use it as an actual burrito filling or nacho topping, too.

Burrito bowl (Project 365: 93/365)

Slow-Cooker Chicken Burrito Bowl 
Adapted from Slow-Cooker Chicken and Pinto Bean Burrito Bowl
Serves 6-8

Ingredients
  • 2 lb boneless, skinless chicken thighs
  • 1 16-18oz jar of your favorite salsa
  • 1 Tbsp cumin
  • 1 Tbsp chili powder
  • a healthy squeeze (approximately 1 tsp) agave nectar
  • 1 15oz can pinto beans
  • cooked brown or white rice
  • salt and pepper to taste
  • Any combination of your favorite toppings or add-ins, including:
    • cooked corn
    • guacamole
    • sour cream
    • shredded cheese
    • sliced olives
    • finely diced onions
    • chopped cilantro
    • lime wedges

Directions
Put chicken in a medium (3-4 qt) slow cooker. Mix together salsa, cumin, chili powder and agave nectar and pour over chicken. Cook on low for 6 hours (chicken thighs are pretty forgiving, so you can go longer, but it's better if you have a slow cooker that can switch to "keep warm" mode after 6 hours). 

After 6 hours, shred chicken with 2 forks right in the slow cooker. Drain and rinse the pinto beans and add to the chicken mixture in the slow cooker. Stir to combine, and cover the slow cooker and cook for an additional 1/2 hour on high or 1 hour on low. Taste and season with additional salt and pepper if needed (I usually don't need to add any).

Meanwhile, cook rice, if it's not already made. Season hot rice with a bit of salt and pepper (some lime juice is nice if you happen to have it, but completely optional). 

Make your burrito bowls by spooning a bed of rice into a bowl, and topping with a hearty serving of the chicken and bean mixture. Top with your favorite additions (corn and guacamole are the standard toppings in the Slacker Gourmet household). Enjoy!

Print this recipe!