Saturday, April 5, 2014

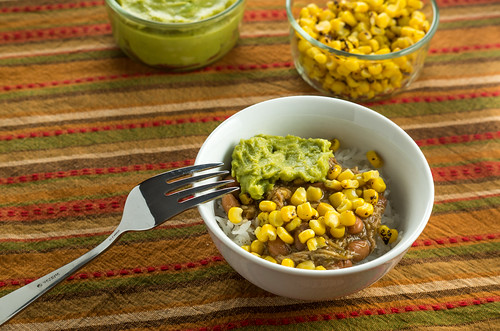
Slow-Cooker Chicken Burrito Bowl (gluten-free, dairy-free)

Life has gotten in the way of this Slacker Gourmet these past few weeks. Our oldest cat, Oliver, was diagnosed with lymphoma in March (following over a month of mysterious symptoms and red herrings leading to incorrect diagnoses), and the 3 weeks that followed were filled with vet visits, tube feeding, and absolutely no cooking at home. Unfortunately, chemotherapy was unsuccessful and he had become too weak to fight any longer, so we had to make the devastating decision to put him to sleep on March 30. The house feels so much emptier without his room-filling purrs. :(

But - life goes on, and our other two kitties, Amber and Orville have been getting awfully spoiled this past week. The emotional toll of the past couple of months plus the constant stream the takeout and restaurant food of the past few weeks haven't done good things to our bodies. It was time to ease back into home cooking, and what better way than with a home adaptation of a takeout favorite?

Burrito bowl

One of my favorite fast-food(ish) compromises is a burrito bowl from Chipotle. 85% of the deliciousness of a burrito, with about 50% of the guilt. It's easy to recreate most of the yummyness of the bowl at home with a few simple ingredients (and some Slacker Gourmet shortcuts)! Jarred salsa (I use Goya Salsa Verde, due to the hubby's tomato sensitivity), frozen rice and corn (Trader Joe's frozen roasted corn is amazing, if you can get your hands on it!), prepared guacamole, and boneless chicken thighs make this come together so quickly - 5-10 minutes of prep in the morning, and another 10 minutes at night.

This is not a beautiful dish. If I had used sour cream and shredded cheese and sliced avocado, it could have been prettier... but that's at odds with the dairy-free (and always-lazy) Slacker Gourmet household these days. Of course, you can use whatever toppings you'd like!

The recipe as written makes A LOT of the chicken and bean mixture - but it freezes really well for future use! You can always use it as an actual burrito filling or nacho topping, too.

Burrito bowl (Project 365: 93/365)

Slow-Cooker Chicken Burrito Bowl 
Adapted from Slow-Cooker Chicken and Pinto Bean Burrito Bowl
Serves 6-8

Ingredients
  • 2 lb boneless, skinless chicken thighs
  • 1 16-18oz jar of your favorite salsa
  • 1 Tbsp cumin
  • 1 Tbsp chili powder
  • a healthy squeeze (approximately 1 tsp) agave nectar
  • 1 15oz can pinto beans
  • cooked brown or white rice
  • salt and pepper to taste
  • Any combination of your favorite toppings or add-ins, including:
    • cooked corn
    • guacamole
    • sour cream
    • shredded cheese
    • sliced olives
    • finely diced onions
    • chopped cilantro
    • lime wedges

Directions
Put chicken in a medium (3-4 qt) slow cooker. Mix together salsa, cumin, chili powder and agave nectar and pour over chicken. Cook on low for 6 hours (chicken thighs are pretty forgiving, so you can go longer, but it's better if you have a slow cooker that can switch to "keep warm" mode after 6 hours). 

After 6 hours, shred chicken with 2 forks right in the slow cooker. Drain and rinse the pinto beans and add to the chicken mixture in the slow cooker. Stir to combine, and cover the slow cooker and cook for an additional 1/2 hour on high or 1 hour on low. Taste and season with additional salt and pepper if needed (I usually don't need to add any).

Meanwhile, cook rice, if it's not already made. Season hot rice with a bit of salt and pepper (some lime juice is nice if you happen to have it, but completely optional). 

Make your burrito bowls by spooning a bed of rice into a bowl, and topping with a hearty serving of the chicken and bean mixture. Top with your favorite additions (corn and guacamole are the standard toppings in the Slacker Gourmet household). Enjoy!

Print this recipe!
Sunday, March 16, 2014

Oven-Cooked Bacon: Which Method Works Better?

Oven-Cooked Bacon

My name is Val, and I love bacon. (Hi Val!)

However, I don't love cooking bacon. Standing over the stove, with my vision slowly being obscured by the thin film of bacon grease covering my glasses... I'm not interested. Sure, it's great to have a batch of bacon grease at the end to save for another application, but I never actually end up saving it (mostly because I'd find an excuse to fry EVERYTHING in the leftover grease, and I enjoy keeping my heart beating regularly). 

I don't mind bacon that's been cooked in the microwave, but it requires some annoying cleanup as well. Purpose-made plates with ridges and channels to let the bacon drain as it cooks are a pain to wash, and the microwave ends up covered in grease splatters.

Links have been circulating on Facebook and Pinterest claiming that you can cook bacon in the oven. There are a few methods out there - on top of a cooling rack, directly on a foil-lined baking sheet, and by making a "rack" out of foil. I immediately discounted the cooling rack method, having had multiple bad experiences with trying to wash little meaty bits out of the grid (and the last cooling rack I tried to wash in the dishwasher got completely rusted over, so I'm not eager to ruin another one). 

So that leaves the 2 foil-based methods for easy cleanup. Whenever I roast veggies or make tater tots, I line a baking sheet with foil so that I don't have to wash it afterwards. The idea of applying that same principle to bacon-making was very appealing. 

I suspected that the rack made from the foil "accordion" would be more effective for crisping the bacon by allowing for more airflow and draining the grease. Conversely, I figured that the bacon cooked directly on the pan would be soggier and greasier from sitting in its own fat without draining. 

Both methods began with lining the baking sheet with foil. If your aluminum foil isn't wide enough to fold over the sides of the pan (to prevent the bacon grease from getting on the pan), crimp 2 pieces together in the middle by lying one piece on top of the other, and folding the long sides over each other 2-3 times. When the pieces are secured together, spread them out - you should have a double-wide piece of foil to line your pan and fold easily over all sides.

Oven-Cooked Bacon

For the foil "accordion" rack, simply fold a piece of heavy-duty foil that's about twice as long as the pan back and forth like an accordion, and spread it out to fit in the pan. The bacon is then laid out over the "rack". Don't have heavy-duty foil? Stack 2 pieces of regular foil and fold as if it was one piece.

Oven-Cooked Bacon

Both batches of bacon were started in a cold oven, set to 400°F. Since I used a thicker-cut bacon (not super-thick, but thicker than typical bacon), I left them in the oven for 30 minutes total, but began checking on them every few minutes at the 18 minute mark. After removing from the oven, I drained and blotted both batches with paper towels.

Oven-Cooked Bacon

Oven-Cooked Bacon

I was surprised by the end results. The bacon cooked directly on the pan ended up cooking more evenly, and was less greasy after blotting. The bacon cooked on the "accordion" rack didn't drain nearly as well as I had theorized. The bottom of the bacon strips didn't cook nearly as well as the top because they weren't in contact with a hot pan. They ended up greasy and slightly flabby, even after blotting. Don't get me wrong - I still ate plenty of bacon from both batches. But, it's not worth using extra foil and an extra couple of minutes to fashion a makeshift "rack", and that makes this Slacker Gourmet very happy.

Oven-Cooked Bacon

Oven-Cooked Bacon
Serves 1 - 4 people
Adapted from many, many people on the internet

Ingredients
  • 1 lb bacon
Directions
Line a baking sheet with foil, making sure to fold the foil over the sides to prevent bacon grease leaks. If your aluminum foil isn't wide enough, make a double-wide piece of foil by crimping 2 pieces together in the middle.

Lay the bacon out evenly across the baking sheet - try not to have them touch. Put the baking sheet in a cold oven and set it to 400°F. For thinner pieces of bacon, begin checking for doneness at the 17 minute mark. For thicker-cut bacon, begin checking for doneness at 20 minutes. 

When the bacon is browned around the edges and at your preferred doneness level, remove the baking sheet from the oven. Using tongs if the bacon is too hot to handle, transfer the bacon strips to a paper towel-lined plate, and blot the top of the bacon with another layer of paper towels. 

If you want to save the bacon grease, carefully pick up the foil lining and drain the grease into a container. If you just want to dispose of it, you can do one of two things: layer some paper towels on the foil to soak up most of the bacon grease, then carefully fold up the foil for disposal; or wait until the grease cools and solidifies and fold up the foil at that point. Hopefully, you shouldn't need to wash the pan!

Print this recipe!
Tuesday, March 4, 2014

Maple Nut Oatmeal Cookies

Maple Nut Oatmeal Cookies (Project 365: 62/365)

Our oldest kitty, Oliver, hasn't been feeling quite like himself for awhile. Even after many vet visits, he ended up at the emergency vet for a couple of nights this past weekend. I don't want to get into too many details about what's wrong, but he came home with a feeding tube for meals for now. This has resulted in me making what can only be described as a "liver milkshake" in smell and texture out of canned food and water, for pumping into the feeding tube. Yummy.

Partially to distract myself from worrying about Ollie, and yes, partially to eradicate the lingering odor of his dinner, I set out to make some more oatmeal cookies. As much as I adore my double chocolate peanut butter oatmeal cookies (known as DCPBOC from here on out), I wanted to make something with a completely different flavor profile. I wanted to use the same basic recipe, with the building blocks of nut butter, oats and gluten-free flour giving the same soft-but-toothsome texture, so I settled on making a maple nut oatmeal cookie.

Maple Nut Oatmeal Cookies

The recipe is quite similar to the DCPBOC - almond butter instead of peanut, grade B maple syrup (for a distinct but not overwhelming maple flavor) instead of brown sugar, extra flour and less milk, and pecans instead of chocolate chips. The resulting cookies, based on my initial guesses at amounts for substitutions, were everything I hoped for - maybe more! Salty, sweet, nutty... just like me.

As with the DCPBOC, I made these gluten-free and vegan, but regular all-purpose flour and dairy milk should work just fine here. Even though we don't typically eat vegan in our house, I love making eggless cookies because I can rationalize "taste-testing" a lot more cookie dough without raw eggs giving me pause. So go ahead - let your kiddos and your grandmothers grab a spoon and eat the dough too - I won't tell.

Maple Nut Oatmeal Cookies

Maple Nut Oatmeal Cookies
Yield: approximately 2 dozen 2" cookies
Adapted from Double Chocolate Peanut Butter Oatmeal Cookies

Ingredients
  • 1 cup almond butter (9 oz by weight)
  • 1/2 cup grade B maple syrup (if you dare to use pancake syrup, we can no longer be friends)
  • 2 tsp vanilla extract
  • 1 cup gluten-free AP flour OR regular AP flour
  • 1 cup rolled oats
  • 1 tsp baking soda
  • 1/2 tsp kosher salt
  • 1/4 cup non-dairy milk OR dairy milk
  • 3/4 cup chopped nuts (I used pecans, but walnuts, almonds or hazelnuts would also be nice)
Directions
Preheat oven to 350°F. Line a couple of sheet pans with parchment paper.

Add almond butter and maple syrup to the bowl of your stand mixer, and beat on medium speed until well combined (2-3 minutes). Add vanilla extract and beat until mixed in.

Stop the mixer. Add the flour and mix on a low speed until just combined. Stop the mixer again, add oats, baking soda, and salt and mix again on low speed until just combined.

The dough at this point should be somewhat crumbly and sticky. With the mixer running at a low to medium speed, add the milk in a thin stream. By the time you finish adding the milk, the dough should come together and pull away from the sides of the bowl.

Stop the mixer, remove the bowl and mix in the chopped nuts with a spoon. Using a cookie scoop (I used my OXO Good Grips Medium Cookie Scoop) or 2 spoons, drop rounded tablespoonfuls of dough a couple inches apart on the prepared sheet pans. If you're using a cookie scoop - don't overfill it - this dough is pretty sticky and thick, so you don't want to overtax the spring release mechanism. Flatten them out to about 1/4 inch thick with the palm of your hand - they won't spread much in the oven.

Bake for 9 - 10 minutes (11 minutes in my oven, but I tend to always need another minute past the upper bound of recipe times) - the tops of the cookies should look slightly dry and may be starting to just barely crack in places. Remove from the oven and let cool on the pans for 5 minutes, then transfer the cookies to a cooling rack to finish cooling. Enjoy with a glass of milk, or with more cookies.

Print this recipe!

Maple Nut Oatmeal Cookies
Tuesday, February 25, 2014

Pumpkin Sausage Sauce

Pumpkin Sausage Sauce (Project 365: 54/365)

Winter, why won't you end? We had a brief reprieve with a sunny, 50 degree day this past Saturday, but now we're back to gusty winds, frosty air, and the promise of more snow. Oh well - spring veggies and grilling time will come soon enough. In the meantime, I have more hearty, cold-weather recipes to share.

A few months ago, I was browsing Instagram. Laura of Mangia Paleo had posted a picture of homemade pumpkin bolognese over spaghetti squash, and I started drooling. However, I looked up the recipe, and one of the ingredients was a jar of marinara sauce. Brilliant idea, adding tomatoes and seasoning all at once, but with a tomato-allergic husband, this recipe was a no-go. But, I just couldn't get the idea of a meaty pumpkin sauce out of my head.

I set out to find another pumpkin bolognese recipe that didn't rely on added tomatoes, and failed. Tomatoes have a unique characteristic that blends together so well with other ingredients, so I didn't want to just leave them out of a recipe without a substitute in place. Suddenly, it came to me - instead of ground beef, why not use sausage meat instead? Letting sausage simmer with other ingredients is a really easy way to infuse great flavor into a sauce.

Turns out I was onto something! There are many recipes for pumpkin sausage sauce out there. But most of them called for the addition of heavy cream at the end to add richness. I liked the idea of a creamy sauce, but since we try to limit our dairy intake, I discovered that full-fat coconut milk could play that part quite easily. The mild coconut flavor melded harmoniously with the subtle pumpkin sweetness.

The flavor profile of the finished sauce will heavily depend on the sausage you choose to use. I typically use sweet Italian sausage, but hot Italian sausage, chorizo, or even a good breakfast sausage would be a delicious change. If you can find bulk (uncased) sausage meat, that will make your life easier - otherwise, you'll have to pull the casings off the sausage. Be sure to use the best quality sausage you find! The recipe wouldn't work quite as well with pre-cooked sausage since you finish cooking the sausage (and infusing the seasoning) in the sauce.

Like many of my recent recipes, this sauce is easily adapted to many different ways of eating. Paleo? It's fabulous served over spaghetti squash (which adds its own sweetness and a welcome crunch). Gluten-free? Either spaghetti squash or gluten-free pasta (which, quite frankly, is more photogenic, so that's how I made it for the pictures). Vegetarian/vegan? Well... I hear that Soyrizo is pretty tasty (I've never tried it), so you could try that in place of the sausage. If you do, let me know how it comes out!

Pumpkin Sausage Sauce

Pumpkin Sausage Sauce
Serves 4-6

Ingredients
  • 1 15oz can pumpkin puree (no spices, just pumpkin!)
  • 1 cup chicken broth OR vegetable broth
  • 1 tsp dried sage
  • a sprinkle of nutmeg
  • a splash of olive oil
  • 1 clove minced garlic (the pre-minced stuff is fine)
  • 1 lb bulk sausage OR 1 lb sausage links, casings removed (any type - breakfast, Italian, chorizo, etc.)
  • a couple of handfuls quick-wilting greens (baby spinach, baby arugula, baby kale, etc.)
  • ½ cup full-fat unsweetened coconut milk OR ½ cup heavy cream
  • salt and pepper to taste
  • a 2-3 lb spaghetti squash OR 12oz dry pasta

Directions
Before starting to make the sauce:
If you're making spaghetti squash, get it prepped and start cooking it using your favorite method. If you're making pasta, start boiling water for the pasta.

Combine pumpkin puree, chicken broth, sage, nutmeg, a pinch of kosher salt, and a grind of black pepper in a decent-sized saucepan (it will eventually hold all of the ingredients). Bring to a simmer over medium heat, stirring occasionally to combine as it heats up.

While the pumpkin mixture is heating, in a nonstick skillet, heat a splash of olive oil and add some minced garlic. Cook for a couple of minutes, till garlic is fragrant but not too brown. Add sausage meat to skillet and break up with spatula, and cook just until no pink remains (but not really brown and crispy).

Using a slotted spoon, add the sausage and garlic to the saucepan with the pumpkin mixture. Bring back to a simmer and let it simmer for 10-15 minutes.

While the sauce is simmering:
If you're making spaghetti squash, scrape out your spaghetti squash strands and set aside. If you're making pasta, cook your pasta according to the package instructions. Drain and set aside.

Add the greens to the sauce, a handful at a time, stirring each handful in until it wilts. Let it simmer for another minute or 2.

Add coconut milk and stir to combine. Taste sauce and add any additional salt and pepper if needed.

Toss with spaghetti squash or pasta. Top with grated parmesan or romano cheese, if desired.

Print this recipe!
Sunday, February 23, 2014

Recipe Shout-Out: Chocolate Hazelnut Coconut Fudge

Fauxdge (Project 365: 36/365)

While looking for easy recipes for gluten- and dairy-free sweet treats a few weeks ago, I came across something that sounded too good to be true: creamy, rich vegan fudge made with only 5 ingredients (6 if you count the fleur de sel sprinkled on top). I had all of the ingredients on hand though, so I gave it a try.

Guess what? It was every bit as good as the original recipe promised! "Real" fudge has a slight sugar-graininess that I don't love, but this "fauxdge" had a smooth, almost truffle-like texture. I also really liked that it isn't super-sweet, but it's very chocolate-y. It came together quickly in my trusty food processor - the only hard part was waiting for it to set up in the fridge.

I've got some plans for experimenting with some other flavor combinations - if I come up with something brilliant, I'll write about it! For now, though, you should give the original recipe a try, because you can't really go wrong with chocolate, coconut and hazelnut (well, unless you're allergic, in which case, I'm sorry!).

Get the recipe: Crazy Delicious Dairy-Free Chocolate Fudge from Oh My Veggies
Tuesday, February 18, 2014

Side Dish: Roasted Frozen Vegetables

Roasted frozen veggies

When you were a kid, and your mom needed to add a last-minute veggie side dish to dinner, chances are she did one of two things: (a) opened up a can of veggies and boiled them, or (b) opened up some frozen veggies and boiled them. Like most other kids, you probably staged a coup at the dinner table, which most likely ended in tears and/or an empty stomach.

Then... you became an adult and realized that Mom was just trying to keep your meals balanced as best she could with a busy schedule. Soon, you found yourself in a similar place - eating dinner at home is healthier and much easier on the wallet, but some nights you're too tired to cook a meal from scratch (even a Slacker Gourmet meal), or you just don't have the right ingredients on hand.

In our house, when we have one of those nights, our go-to meal is either chicken sausage or bratwurst, and some kind of frozen seasoned veggie blend. However, since the hubby has some food sensitivities, that narrows the field to about 2 - 3 types of seasoned veggie blends, and we get tired of them pretty quickly. Plus, they've still got a bit more salt and not-entirely-wholesome ingredients than we'd like. So what's a Slacker Gourmet supposed to do?

Canned vegetables? NOPE. They're generally loaded up with salt (yes, I know they make no-salt-added varieties), and the texture, even before you cook them, is not quite right. They have a strange, mushy texture and slightly tinny taste. No thank you.

Plain frozen vegetables, on the other hand, have the potential to be a blank canvas in the right application. They're completely unseasoned, they're already cut up, it doesn't matter if they're in-season or not, and they've already been blanched before they are frozen (meaning they are partially cooked even before you get your hands on them). However, the cooking directions on the bags always suggest either steaming them in the microwave, or (gulp) boiling them. Can we treat them better?

One of my favorite ways to cook fresh vegetables is to roast them. Roasting at a high heat caramelizes the edges, brings out sweetness and nutty flavors, and tames the bitter edge on many vegetables. Of course, this works best on larger, harder veggies like brussels sprouts, potatoes, cauliflower, etc. - not so well on corn (off the cob) or peas, for example.

I got to thinking - can we roast frozen vegetables straight from the freezer? The answer: YES! The final texture is slightly different from roasted fresh vegetables, and the cooking time (which is almost completely inactive) is about 40 minutes, but there is barely any prep involved. Most importantly, the flavor of these humble frozen vegetables goes from boiling's "blech!" to "hey, these are pretty good!" They'll never be nearly as amazing as roasted fresh veggies, but they're a good trick to have up your sleeve.

I tried roasting frozen cauliflower, Brussels sprouts, crinkle-cut carrots, broccoli and green beans. The Brussels sprouts were the biggest disappointment - they're my absolute favorite roasted fresh vegetable, but their frozen counterparts just didn't have a fantastic flavor. I suspect that they are more sensitive to the blanching and freezing process than other vegetables. The carrots didn't really brown up; they seemed to get a little dry on the outside instead. The flavor really concentrated and got nice and sweet, though. The cauliflower and broccoli were tasty, but the surprise favorite of the bunch were the green beans! They started getting crispy in places and almost tasted like green bean chips. Yum!

Frozen veggies after roasting

Roasted Frozen Vegetables
Serves 4-6 (or whatever the bag says)

Ingredients
  • 1 lb bag frozen vegetables - cauliflower, broccoli, carrots, etc. (please use bagged veggies and not frozen-in-a-brick veggies!)
  • a couple of glugs of olive oil (approximately 2 Tbsp)
  • salt and pepper to taste

Directions
Preheat oven to 400°F. Line a cookie sheet with aluminum foil for easy cleanup, and put a cooling rack on top of the cookie sheet. I used a cooling rack as the cooking surface to allow air to circulate all around the veggies so any additional water would drain off, and I didn't have to toss them at all during cooking. If you don't have a cooling rack, you'll probably want to stir the veggies a couple of times during cooking. 

Toss the still-frozen veggies with olive oil, and season generously with salt and pepper. Spread the veggies on the cooling rack, and roast for 10 minutes. 

Boost the oven temperature to 450°F, and roast veggies for another 30 minutes, or until they are nice and browned around the edges. Enjoy!

Print this recipe!


I personally like my roasted veggies seasoned simply with salt and pepper, but feel free to experiment with different oils and seasonings! A sprinkle of parmesan or Cabot Cheddar Shake at the end would also be great.

And if after all this, you try roasting canned vegetables, I really don't want to hear about it. Ew.

Roasted frozen veggies
Tuesday, February 11, 2014

Double Chocolate Peanut Butter Oatmeal Cookies

Double chocolate peanut butter oatmeal cookies

Hello, fellow lazy foodies! After an extended spell of putting the slacker in Slacker Gourmet, I'm back! Don't worry, I hadn't forgotten about this humble little corner of the food blogosphere.

What have I been up to? Well, here's the thing. A few months ago, my husband was diagnosed with a whole slew of food intolerances, including gluten, wheat, rye, yeast and casein. The doctor put him on a strict elimination diet to avoid all of the trigger foods, which ended up lasting 3 months (right through the holiday season - yikes!). So I was cooking, all right, but much of it was far from Slacker Gourmet - there was a lot of experimentation and substitution. For the most part, I stuck with recipes that other, far smarter, bloggers and chefs had developed.

The hubby is off the elimination diet now, but has discovered that he does indeed feel better when he avoids dairy and gluten most of the time. Since this is now a part of our everyday lives, I've started to adapt and streamline recipes to fit into our busy schedules, and I'm looking forward to sharing them! I've also restarted Project 365, so I'm taking more and more photos (and learning how to take proper food photos). Now that I keep my camera close to me at all times, it's much easier for me to remember to grab a few photos of something I've made so I can write about it! I'm hoping to settle into a weekly update schedule eventually.

Anyway... enough about me! Let's talk about cookies, shall we?

I'm not much of a baker to begin with, but add in the constraint of staying gluten-free and dairy-free, and I'm ready to just break out the box mixes and be done with it. However, there were some recipes that the hubby really loved that I wanted to try to adapt. In general, the less reliant a baked good was on flour, the better chance I had of adapting it successfully.

One of the recipes that worked really well was this recipe for Healthy Peanut Butter Chunk Oatmeal Bars. It was already dairy-free, so I only had to use gluten-free oats and swap in a gluten-free AP flour blend (I've been using Namaste), and it worked beautifully.

There are a couple of drawbacks, though. When I make bars, brownies, etc., I really love using my Chicago Metallic Slice Solutions Brownie Pan - it's got the convenient sling to lift the bars out, and the cutting grid gives me beautiful bars every time (if I try to cut them myself, I inevitably end up with a crumbly mess). But the darn thing is a pain to grease (even though it's nonstick, i don't trust it that much), and even more of a pain to wash.

The bars themselves are also pretty serious. They're thick and filling, which is great sometimes, but not always what you're looking for. I've taken to cutting them in half from the original bar size, but... see above about the crumbly mess. Yeah.

I got to thinking - can I adapt these into cookies instead? Parchment-lined cookie sheets don't need to be washed (usually). If I could make cookies... then all of my equipment could go into the dishwasher. Plus, I could make them a little more manageably sized. For cookies, though, I was afraid that the amount of flour in the bars would make for a crumbly, dry cookie, so I swapped out 1/4 of it for raw cacao powder.

The results? A resounding success, I'd say! These cookies come together quickly with a stand mixer - you can have these mixed, baked, and cooled in well under an hour. They're also perfect for nearly any food restriction (well, except for a peanut or chocolate allergy) - no one would be able to tell that they are gluten-free or vegan unless you tell 'em. Plus, you can go ahead and eat the uncooked dough - no raw eggs to worry about!

Double chocolate peanut butter oatmeal cookies


Double Chocolate Peanut Butter Oatmeal Cookies
Yield: approximately 2 dozen 2" cookies
Adapted from Healthy Peanut Butter Chunk Oatmeal Bars

Ingredients
  • 1 cup peanut butter (see below for measuring tips)
  • 1/2 cup brown sugar
  • 2 tsp vanilla extract
  • 3/4 cup gluten-free AP flour OR oat flour OR whole wheat flour
  • 1/4 cup raw cacao powder OR cocoa powder
  • 1 cup rolled oats
  • 1 tsp baking soda
  • 1/4 tsp kosher salt
  • 1/2 cup non-dairy OR dairy milk
  • 1 cup semi-sweet or dark chocolate chips (check the label to make sure they fit in with any food restrictions) 

Directions
Preheat oven to 350°F. Line a couple of sheet pans with parchment paper.

Add peanut butter and brown sugar to the bowl of your stand mixer, and beat on medium speed until light and fluffy (2-3 minutes). Add vanilla extract and beat until mixed in.

Stop the mixer. Add the flour and cacao powder, and mix on a low speed until just combined. Stop the mixer again, add oats, baking soda, and salt and mix again on low speed until just combined. Stopping and starting the mixer keeps you from throwing the dry goods all over the kitchen - don't ask me how I know that.

The dough will look very dry and crumbly now - that's okay! With the mixer running at a low to medium speed, add the milk in a thin stream. By the time you finish adding the milk, the dough should come together and pull away from the sides of the bowl.

Stop the mixer, remove the bowl and mix in the chocolate chips with a spoon. Using a cookie scoop (I used my OXO Good Grips Medium Cookie Scoop) or 2 spoons, drop rounded tablespoonfuls of dough a couple inches apart on the prepared sheet pans. Smush 'em down a little bit - they won't spread much in the oven.

Bake for 10 - 12 minutes (13 minutes in my oven, but I tend to always need another minute past the upper bound of recipe times) - the tops of the cookies should look slightly dry and may be starting to just barely crack in places. Remove from the oven and let cool on the pans for 5 minutes, then transfer the cookies to a cooling rack to finish cooling. Try not to eat all of them in one sitting.

Print this recipe!


Let's discuss the elephant in the room - peanut butter.

I hate measuring peanut butter. Even with a handy little plunger-style measuring cup (like this one from OXO), it's still a sticky mess. I've found a couple of ways to lessen the pain, though.

If you have a kitchen scale, a cup of peanut butter is 9 oz by weight, so you can just put your stand mixer bowl on the scale, zero it out, then scoop 9 oz right into the bowl. In fact, go right ahead and add 3 5/8 oz of brown sugar in there too - now you don't have to pack it into a measuring cup!

My other sneaky peanut butter measuring trick? Well, most jars of peanut butter are 16 oz, which is not quite 2 cups. But Whole Foods sells their peanut butter in 18 oz jars, which is exactly 2 cups. If you want to be really efficient, go ahead and make a double batch of cookies (though I will warn you that you will be pretty much at max capacity in the classic 4.5 qt KitchenAid mixer).

Double chocolate peanut butter oatmeal cookies